HP ProLiant DL980 DL980 G7 Maintenance & Service Guide - Page 68
From the left and right insertion tabs, slide the upper part of the bezel forward.
 |
View all HP ProLiant DL980 manuals
Add to My Manuals
Save this manual to your list of manuals |
Page 68 highlights
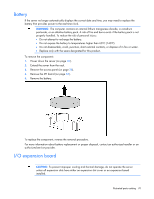
5. Remove the seven screws from the right side of the chassis and eight screws from the left side of the chassis. 6. From the left and right insertion tabs, slide the upper part of the bezel forward. Illustrated parts catalog 68
-
 1
1 -
2
-
3
-
4
-
5
-
6
-
7
-
8
-
9
-
10
-
11
-
12
-
13
-
14
-
15
-
16
-
17
-
18
-
19
-
20
-
21
-
22
-
23
-
24
-
25
-
26
-
27
-
28
-
29
-
30
-
31
-
32
-
33
-
34
-
35
-
36
-
37
-
38
-
39
-
40
-
41
-
42
-
43
-
44
-
45
-
46
-
47
-
48
-
49
-
50
-
51
-
52
-
53
-
54
-
55
-
56
-
57
-
58
-
59
-
60
-
61
-
62
-
 63
63 -
 64
64 -
 65
65 -
 66
66 -
 67
67 -
 68
68 -
 69
69 -
 70
70 -
 71
71 -
 72
72 -
 73
73 -
74
-
75
-
76
-
77
-
78
-
79
-
80
-
81
-
82
-
83
-
84
-
85
-
86
-
87
-
88
-
89
-
90
-
91
-
92
-
93
-
94
-
95
-
96
-
97
-
98
-
99
-
100
-
101
-
102
-
103
-
104
-
105
-
106
-
107
-
108
-
109
-
110
-
111
-
112
 |
 |

Illustrated parts catalog 68
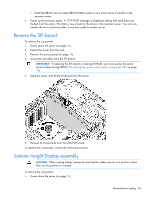
5.
Remove the seven screws from the right side of the chassis and eight screws from the left side of the
chassis.
6.
From the left and right insertion tabs, slide the upper part of the bezel forward.