HP Professional sp750 Compaq Professional Workstation SP750 Hardware Reference - Page 19
Guidelines for RIMM Installation
 |
View all HP Professional sp750 manuals
Add to My Manuals
Save this manual to your list of manuals |
Page 19 highlights
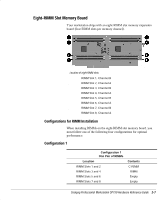
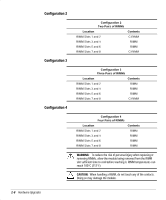
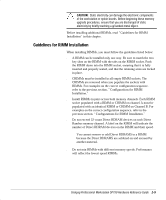
CAUTION: Static electricity can damage the electronic components of the workstation or option boards. Before beginning these memory upgrade procedures, ensure that you are discharged of static electricity by briefly touching a grounded metal object. Before installing additional RIMMs, read “ Guidelines for RIMM Installation” in this chapter. Guidelines for RIMM Installation When installing RIMMs, you must follow the guidelines listed below: s A RIMM can be installed only one way. Be sure to match the two key slots on the RIMM with the tabs on the RIMM socket. Push the RIMM down into the RIMM socket, ensuring that it is fully inserted and properly seated, and that the retaining arms are locked in place. s CRIMMs must be installed in all empty RIMM sockets. The CRIMMs are removed when you populate the sockets with RIMMs. .or examples on the correct configuration sequence, refer to the previous section, “ Configurations for RIMM Installation.” s Install RIMMs in pairs across both memory channels. Each RIMM socket populated with a RIMM or CRIMM on channel A must be populated with an identical RIMM or CRIMM on Channel B. .or examples on the correct configuration sequence, refer to the previous section, “ Configurations for RIMM Installation.” s Do not exceed 32-count Direct RDRAM devices on each Direct Rambus memory channel. A label on the RIMM will indicate the number of Direct RDRAM devices on the RIMM and their speed. ✎ You cannot remove or add Direct RDRAMS to a RIMM because the Direct RDRAMS are soldered on and encased by another material. s Do not mix RIMMs with different memory speeds. Performance will reflect the lowest speed RIMMs. Compaq Professional Workstation SP750 Hardware Reference Guide 2-9
-
 1
1 -
2
-
3
-
4
-
5
-
6
-
7
-
8
-
9
-
10
-
11
-
12
-
13
-
 14
14 -
 15
15 -
 16
16 -
 17
17 -
 18
18 -
 19
19 -
 20
20 -
 21
21 -
 22
22 -
 23
23 -
 24
24 -
25
-
26
-
27
-
28
-
29
-
30
-
31
-
32
-
33
-
34
-
35
-
36
-
37
-
38
-
39
-
40
-
41
-
42
-
43
-
44
-
45
-
46
-
47
-
48
-
49
-
50
-
51
-
52
-
53
-
54
-
55
-
56
-
57
-
58
-
59
-
60
-
61
-
62
-
63
-
64
-
65
-
66
-
67
-
68
-
69
-
70
-
71
-
72
-
73
-
74
-
75
-
76
-
77
-
78
-
79
 |
 |