HP Professional sp750 Compaq Professional Workstation SP750 Hardware Reference - Page 33
Installing a Hard Drive in the Removable Hard Drive Cage Bays 1-3
 |
View all HP Professional sp750 manuals
Add to My Manuals
Save this manual to your list of manuals |
Page 33 highlights
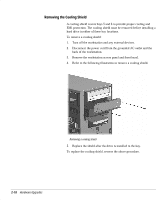
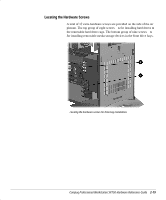
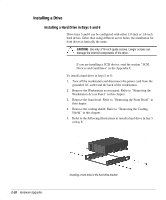
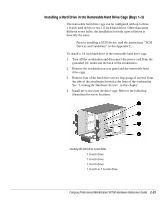
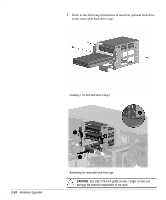
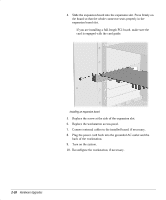
Installing a Hard Drive in the Removable Hard Drive Cage (Bays 1-3) The removable hard drive cage can be configured with up to three 1.0-inch hard drives or two 1.6-inch hard drives. Other than using different screw holes, the installation for both types of drives is basically the same. ✎ Prior to installing a SCSI device, read the instructions “ SCSI Devices and Guidelines” in the Appendix C. To install a 1.0-inch hard drive in the removable hard drive cage: 1. Turn off the workstation and disconnect the power cord from the grounded AC outlet and the back of the workstation. 2. Remove the workstation access panel and the removable hard drive cage. 3. Remove four of the hard drive screws (top group of screws) from the side of the air plenum located at the front of the workstation. See “ Locating the Hardware Screws” in this chapter. 4. Install the screws into the drive cage. Refer to the following illustration for screw locations. Locating the hard drive screw holes 1 1.0-inch drive 2 1.6-inch drive 3 1.0-inch drive 4 1.0-inch or 1.6-inch drive Compaq Professional Workstation SP750 Hardware Reference Guide 2-23
-
 1
1 -
2
-
3
-
4
-
5
-
6
-
7
-
8
-
9
-
10
-
11
-
12
-
13
-
14
-
15
-
16
-
17
-
18
-
19
-
20
-
21
-
22
-
23
-
24
-
25
-
26
-
27
-
 28
28 -
 29
29 -
 30
30 -
 31
31 -
 32
32 -
 33
33 -
 34
34 -
 35
35 -
 36
36 -
 37
37 -
 38
38 -
39
-
40
-
41
-
42
-
43
-
44
-
45
-
46
-
47
-
48
-
49
-
50
-
51
-
52
-
53
-
54
-
55
-
56
-
57
-
58
-
59
-
60
-
61
-
62
-
63
-
64
-
65
-
66
-
67
-
68
-
69
-
70
-
71
-
72
-
73
-
74
-
75
-
76
-
77
-
78
-
79
 |
 |
