HP Scitex FB500 HP Scitex FB500 and FB700 Printer Series - User Guide - Page 17
Work with the rigid media tables, operating position - press release
 |
View all HP Scitex FB500 manuals
Add to My Manuals
Save this manual to your list of manuals |
Page 17 highlights
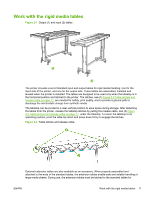
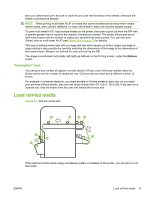
Work with the rigid media tables Figure 2-1 Output (1) and input (2) tables The printer includes a set of standard input and output tables for rigid media handling: one for the input side of the printer, and one for the output side. These tables are assembled, installed and leveled when the printer is installed. The tables are designed to be used only when the tabletop is in the horizontal position and latched to the printer. The latches, see (1) Figure 2-2 Table latches and release cable on page 11, are needed for safety, print quality, and to provide a ground path to discharge the electrostatic charge from synthetic media. The tabletop can be pivoted to a near-vertical position to save space during storage. After detaching the tables from the printer, release the tabletop latches by pulling the release cable, see (2) Figure 2-2 Table latches and release cable on page 11, under the tabletop. To return the tabletop to its operating position, pivot the table top down and press down firmly to engage the latches. Figure 2-2 Table latches and release cable Optional extension tables are also available as an accessory, When properly assembled and attached to the ends of the standard tables, the extension tables enable safe and reliable handling of large media sheets. During use, the extension tables must be latched to the standard tables for ENWW Work with the rigid media tables 11
-
 1
1 -
2
-
3
-
4
-
5
-
6
-
7
-
8
-
9
-
10
-
11
-
 12
12 -
 13
13 -
 14
14 -
 15
15 -
 16
16 -
 17
17 -
 18
18 -
 19
19 -
 20
20 -
 21
21 -
 22
22 -
23
-
24
-
25
-
26
-
27
-
28
-
29
-
30
-
31
-
32
-
33
-
34
-
35
-
36
-
37
-
38
-
39
-
40
-
41
-
42
-
43
-
44
-
45
-
46
-
47
-
48
-
49
-
50
-
51
-
52
-
53
-
54
-
55
-
56
-
57
-
58
-
59
-
60
-
61
-
62
-
63
-
64
-
65
-
66
-
67
-
68
-
69
-
70
-
71
-
72
-
73
-
74
-
75
-
76
-
77
-
78
-
79
-
80
-
81
-
82
-
83
-
84
-
85
-
86
-
87
-
88
-
89
-
90
-
91
-
92
-
93
-
94
-
95
-
96
-
97
-
98
-
99
-
100
-
101
-
102
 |
 |
