HP T1100 HP Designjet T1100 Printer Series - User's Guide - Page 57
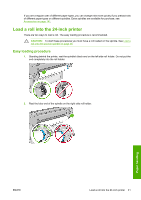
Load a roll into the 44-inch printer, Easy loading procedure
 |
UPC - 883585044979
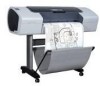
View all HP T1100 manuals
Add to My Manuals
Save this manual to your list of manuals |
Page 57 highlights
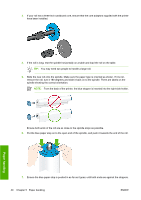
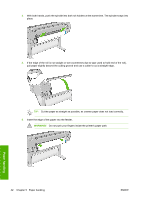
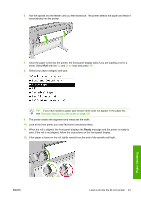
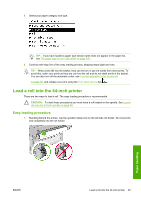
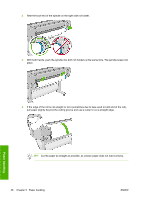
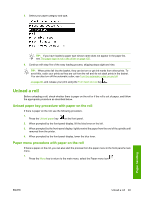
5. Select your paper category and type. TIP: If you have loaded a paper type whose name does not appear in the paper list, see The paper type is not in the driver on page 150. 6. Continue with step five of the easy loading process, skipping steps eight and nine. TIP: When prints fall into the basket, they can be torn or get ink marks from other prints. To avoid this, catch your prints as they are cut from the roll and do not stack prints in the basket. You can also turn off the automatic cutter, see Turn the automatic cutter on and off on page 56, and release your print using the Form feed and cut key . Load a roll into the 44-inch printer There are two ways to load a roll. The easy loading procedure is recommended. CAUTION: To start these procedures you must have a roll loaded on the spindle. See Load a roll onto the 24-inch spindle on page 36. Easy loading procedure 1. Standing behind the printer, rest the spindle's black end on the left side roll holder. Do not put the end completely into the roll holder. Paper handling ENWW Load a roll into the 44-inch printer 45
-
 1
1 -
2
-
3
-
4
-
5
-
6
-
7
-
8
-
9
-
10
-
11
-
12
-
13
-
14
-
15
-
16
-
17
-
18
-
19
-
20
-
21
-
22
-
23
-
24
-
25
-
26
-
27
-
28
-
29
-
30
-
31
-
32
-
33
-
34
-
35
-
36
-
37
-
38
-
39
-
40
-
41
-
42
-
43
-
44
-
45
-
46
-
47
-
48
-
49
-
50
-
51
-
 52
52 -
 53
53 -
 54
54 -
 55
55 -
 56
56 -
 57
57 -
 58
58 -
 59
59 -
 60
60 -
 61
61 -
 62
62 -
63
-
64
-
65
-
66
-
67
-
68
-
69
-
70
-
71
-
72
-
73
-
74
-
75
-
76
-
77
-
78
-
79
-
80
-
81
-
82
-
83
-
84
-
85
-
86
-
87
-
88
-
89
-
90
-
91
-
92
-
93
-
94
-
95
-
96
-
97
-
98
-
99
-
100
-
101
-
102
-
103
-
104
-
105
-
106
-
107
-
108
-
109
-
110
-
111
-
112
-
113
-
114
-
115
-
116
-
117
-
118
-
119
-
120
-
121
-
122
-
123
-
124
-
125
-
126
-
127
-
128
-
129
-
130
-
131
-
132
-
133
-
134
-
135
-
136
-
137
-
138
-
139
-
140
-
141
-
142
-
143
-
144
-
145
-
146
-
147
-
148
-
149
-
150
-
151
-
152
-
153
-
154
-
155
-
156
-
157
-
158
-
159
-
160
-
161
-
162
-
163
-
164
-
165
-
166
-
167
-
168
-
169
-
170
-
171
-
172
-
173
-
174
-
175
-
176
-
177
-
178
-
179
-
180
-
181
-
182
-
183
-
184
-
185
-
186
-
187
-
188
-
189
-
190
-
191
-
192
-
193
-
194
-
195
-
196
-
197
-
198
-
199
-
200
-
201
-
202
-
203
-
204
-
205
-
206
-
207
-
208
-
209
-
210
-
211
-
212
-
213
-
214
-
215
-
216
-
217
-
218
-
219
-
220
 |
 |
