HP VLi8 HP Vectra VLi8 SF, Troubleshooting and Upgrade Guide - Page 19
If There Is a Hard Disk or CD-ROM Drive Test Error - vectra bios
 |
View all HP VLi8 manuals
Add to My Manuals
Save this manual to your list of manuals |
Page 19 highlights
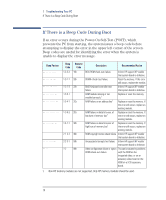
1 Troubleshooting Your PC If There Is a Hard Disk or CD-ROM Drive Test Error If There Is a Hard Disk or CD-ROM Drive Test Error Problem Check that... How Power-On-Self-Test displays hard disk or CD-ROM drive test error The drive is correctly configured in the PC's Setup program. Refer to page 35. 1 Switch the PC OFF then ON. 2 When the Vectra logo appears, press the F2 key. 3 Check the drive is enabled and the correct type is selected. The drive cables are correctly connected. 1 Disconnect the power cord. 2 Remove the PC's cover. 3 Check the drive cables are correctly connected (refer to chapter 2). 4 Close the PC then switch it on and check it works. The drive cable is working. If the drive still does not work... 1 Disconnect the power cord. 2 Remove the PC's cover. 3 Replace the drive cable by a known working cable from the same model of PC (refer to chapter 2). 4 Close the PC then switch it on and check it works. Run DiagTools from Refer to page 10. the floppy drive. You may need to update your PC's Basic Input Output System (BIOS). Create a bootable floppy to update your PC's BIOS. Refer to page 31. The drive is working. 1 Disconnect the power cord. 2 Remove the PC's cover. 3 Carefully replace the drive by a known working drive from the same model of PC (refer to chapter 2). 4 Close the PC then switch it on and check it works. The system board and riser card are working. 1 Disconnect the power cord. 2 Remove the PC's cover. 3 Replace the system board and\or riser card by known working units from the same model of PC. 4 Close the PC, reconnect the power cord and check that the PC and drive work. If the problem persists, contact HP Support or your authorized dealer 19
-
 1
1 -
2
-
3
-
4
-
5
-
6
-
7
-
8
-
9
-
10
-
11
-
12
-
13
-
 14
14 -
 15
15 -
 16
16 -
 17
17 -
 18
18 -
 19
19 -
 20
20 -
 21
21 -
 22
22 -
 23
23 -
 24
24 -
25
-
26
-
27
-
28
-
29
-
30
-
31
-
32
-
33
-
34
-
35
-
36
-
37
-
38
-
39
-
40
-
41
-
42
-
43
-
44
-
45
-
46
-
47
-
48
-
49
-
50
-
51
-
52
-
53
-
54
-
55
-
56
-
57
-
58
-
59
-
60
-
61
-
62
-
63
-
64
-
65
-
66
-
67
-
68
-
69
-
70
-
71
-
72
-
73
-
74
 |
 |
