HP Vectra XM 5/xxx HP Vectra XM 5/xxx Series 3 - User Guide - Page 43
Completing the Video Memory Installation Procedure
 |
View all HP Vectra XM 5/xxx manuals
Add to My Manuals
Save this manual to your list of manuals |
Page 43 highlights
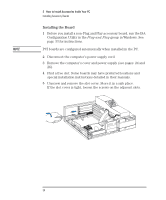
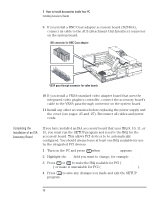
3 How to Install Accessories Inside Your PC Installing Memory If you need to remove the video memory module: Release the retaining clip and pull the module forward and out of the socket 4 Install any other accessories before replacing the cover and power supply (see pages 25 and 27). Reconnect all cables and power cords. Completing the Video Memory Installation Procedure 1 Switch on the PC. 2 Check that the Power-On-Self-Test has automatically detected and configured the Video RAM Size field. 3 When Windows is loaded, click on the Hputils group icon to display the Hewlett-Packard utilities. 4 Click on the HP User Tools icon utility. to display the HP User Tools 5 Click on the Video Mode icon and follow the screen messages to change the video resolution and the number of colors displayed. NOTE If you need to use a special video driver for your application, you may be asked to insert a diskette containing the driver in drive A. In this case, insert the video drivers diskette you created with the Master Disk Creation utility. Alternatively, type C:\MASTERS\VIDDRV\DISKWIN (for Windows applications) or type C:\MASTERS\VIDDRV\DISKDOS (for DOS applications) and press . English 31
-
 1
1 -
2
-
3
-
4
-
5
-
6
-
7
-
8
-
9
-
10
-
11
-
12
-
13
-
14
-
15
-
16
-
17
-
18
-
19
-
20
-
21
-
22
-
23
-
24
-
25
-
26
-
27
-
28
-
29
-
30
-
31
-
32
-
33
-
34
-
35
-
36
-
37
-
 38
38 -
 39
39 -
 40
40 -
 41
41 -
 42
42 -
 43
43 -
 44
44 -
 45
45 -
 46
46 -
 47
47 -
 48
48 -
49
-
50
-
51
-
52
-
53
-
54
-
55
-
56
-
57
-
58
-
59
-
60
-
61
-
62
-
63
-
64
-
65
-
66
-
67
-
68
-
69
-
70
-
71
-
72
-
73
-
74
-
75
-
76
-
77
-
78
-
79
-
80
-
81
-
82
-
83
-
84
-
85
-
86
-
87
-
88
-
89
-
90
-
91
-
92
-
93
-
94
-
95
-
96
-
97
-
98
-
99
-
100
-
101
-
102
-
103
-
104
-
105
-
106
-
107
-
108
-
109
-
110
-
111
-
112
-
113
-
114
-
115
-
116
-
117
-
118
-
119
-
120
-
121
-
122
 |
 |
