HP Vectra XM 5/xxx HP Vectra XM 5/xxx Series 3 - User Guide - Page 48
Completing the, Installation of an ISA, Accessory Board
 |
View all HP Vectra XM 5/xxx manuals
Add to My Manuals
Save this manual to your list of manuals |
Page 48 highlights
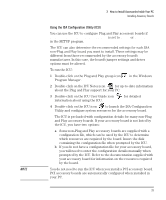
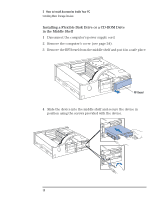
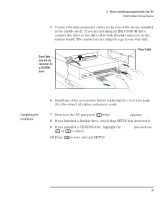
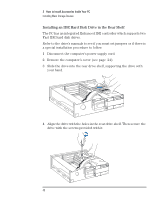
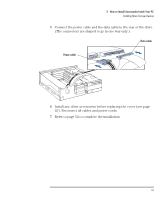
3 How to Install Accessories Inside Your PC Installing Accessory Boards 9 If you install a BNC Coax adapter accessory board (D2746A), connect its cable to the AUI (Attachment Unit Interface) connector on the system board. AUI connector for BNC Coax adapter VESA pass-through connector for video boards 10 If you install a VESA-standard video adapter board that uses the integrated video graphics controller, connect the accessory board's cable to the VESA pass-through connector on the system board. 11 Install any other accessories before replacing the power supply and the cover (see pages 25 and 27). Reconnect all cables and power cords. Completing the Installation of an ISA Accessory Board If you have installed an ISA accessory board that uses IRQ 9, 10, 11, or 15, you must run the SETUP program and reserve the IRQ for the accessory board. This allows PCI devices to be automatically configured. You should always leave at least one IRQ available for use by the integrated PCI devices. 1 Turn on the PC and press when appears. 2 Highlight the IRQ field you want to change, for example IRQ 11. 3 Press or to make the IRQ available for PCI (Available for PCI) or make it unavailable for PCI (Used by an ISA Board). 4 Press to save any changes you made and exit the SETUP program. 36 English
-
 1
1 -
2
-
3
-
4
-
5
-
6
-
7
-
8
-
9
-
10
-
11
-
12
-
13
-
14
-
15
-
16
-
17
-
18
-
19
-
20
-
21
-
22
-
23
-
24
-
25
-
26
-
27
-
28
-
29
-
30
-
31
-
32
-
33
-
34
-
35
-
36
-
37
-
38
-
39
-
40
-
41
-
42
-
 43
43 -
 44
44 -
 45
45 -
 46
46 -
 47
47 -
 48
48 -
 49
49 -
 50
50 -
 51
51 -
 52
52 -
 53
53 -
54
-
55
-
56
-
57
-
58
-
59
-
60
-
61
-
62
-
63
-
64
-
65
-
66
-
67
-
68
-
69
-
70
-
71
-
72
-
73
-
74
-
75
-
76
-
77
-
78
-
79
-
80
-
81
-
82
-
83
-
84
-
85
-
86
-
87
-
88
-
89
-
90
-
91
-
92
-
93
-
94
-
95
-
96
-
97
-
98
-
99
-
100
-
101
-
102
-
103
-
104
-
105
-
106
-
107
-
108
-
109
-
110
-
111
-
112
-
113
-
114
-
115
-
116
-
117
-
118
-
119
-
120
-
121
-
122
 |
 |
