HP Vectra XM 5/xxx HP Vectra XM 5/xxx Series 3 - User Guide - Page 46
Installing the Board
 |
View all HP Vectra XM 5/xxx manuals
Add to My Manuals
Save this manual to your list of manuals |
Page 46 highlights
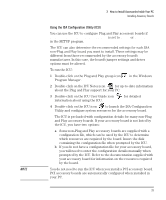
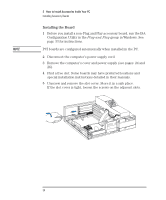
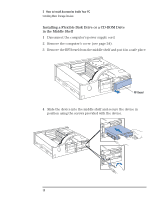
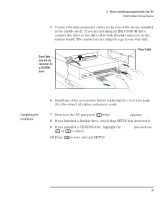
NOTE 3 How to Install Accessories Inside Your PC Installing Accessory Boards Installing the Board 1 Before you install a non-Plug and Play accessory board, run the ISA Configuration Utility in the Plug and Play group in Windows. See page 33 for instructions. PCI boards are configured automatically when installed in the PC. 2 Disconnect the computer's power supply cord. 3 Remove the computer's cover and power supply (see pages 24 and 26). 4 Find a free slot. Some boards may have preferred locations and special installation instructions detailed in their manuals. 5 Unscrew and remove the slot cover. Store it in a safe place. If the slot cover is tight, loosen the screws on the adjacent slots. 34 English
-
 1
1 -
2
-
3
-
4
-
5
-
6
-
7
-
8
-
9
-
10
-
11
-
12
-
13
-
14
-
15
-
16
-
17
-
18
-
19
-
20
-
21
-
22
-
23
-
24
-
25
-
26
-
27
-
28
-
29
-
30
-
31
-
32
-
33
-
34
-
35
-
36
-
37
-
38
-
39
-
40
-
 41
41 -
 42
42 -
 43
43 -
 44
44 -
 45
45 -
 46
46 -
 47
47 -
 48
48 -
 49
49 -
 50
50 -
 51
51 -
52
-
53
-
54
-
55
-
56
-
57
-
58
-
59
-
60
-
61
-
62
-
63
-
64
-
65
-
66
-
67
-
68
-
69
-
70
-
71
-
72
-
73
-
74
-
75
-
76
-
77
-
78
-
79
-
80
-
81
-
82
-
83
-
84
-
85
-
86
-
87
-
88
-
89
-
90
-
91
-
92
-
93
-
94
-
95
-
96
-
97
-
98
-
99
-
100
-
101
-
102
-
103
-
104
-
105
-
106
-
107
-
108
-
109
-
110
-
111
-
112
-
113
-
114
-
115
-
116
-
117
-
118
-
119
-
120
-
121
-
122
 |
 |

3
How to Install Accessories Inside Your PC
Installing Accessory Boards
34
English
Installing the Board
1
Before you install a non-Plug and Play accessory board, run the ISA
Configuration Utility in the
Plug and Play
group in Windows. See
page 33 for instructions.
NOTE
PCI boards are configured automatically when installed in the PC.
2
Disconnect the computer’s power supply cord.
3
Remove the computer’s cover and power supply (see pages
24 and
26).
4
Find a free slot. Some boards may have preferred locations and
special installation instructions detailed in their manuals.
5
Unscrew and remove the slot cover. Store it in a safe place.
If the slot cover is tight, loosen the screws on the adjacent slots.