HP Vectra XM 5/xxx HP Vectra XM 5/xxx Series 3 - User Guide - Page 51
Completing the, Installation
 |
View all HP Vectra XM 5/xxx manuals
Add to My Manuals
Save this manual to your list of manuals |
Page 51 highlights
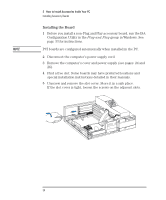
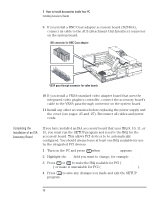
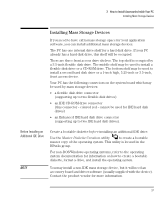
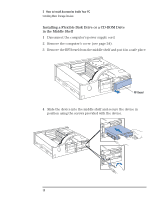
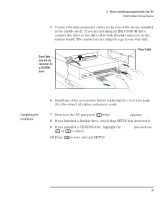
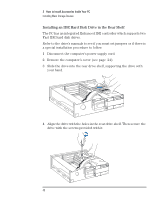
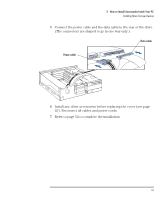
3 How to Install Accessories Inside Your PC Installing Mass Storage Devices 5 Connect the data and power cables to the rear of the device installed in the middle shelf. If you are installing an IDE CD-ROM drive, connect the drive to the data cable with the red connector on the system board. The connectors are shaped to go in one way only. Data Cable (use the red connector for a CD-ROM drive) Power Cable Completing the Installation 6 Install any other accessories before replacing the cover (see page 25). Reconnect all cables and power cords. 7 Switch on the PC and press when appears. 8 If you installed a flexible drive, check that SETUP has detected it. 9 If you installed a CD-ROM drive, highlight the IRQ 15 line and use or to select Used by an ISA Board. 10 Press to save and exit SETUP. English 39
-
 1
1 -
2
-
3
-
4
-
5
-
6
-
7
-
8
-
9
-
10
-
11
-
12
-
13
-
14
-
15
-
16
-
17
-
18
-
19
-
20
-
21
-
22
-
23
-
24
-
25
-
26
-
27
-
28
-
29
-
30
-
31
-
32
-
33
-
34
-
35
-
36
-
37
-
38
-
39
-
40
-
41
-
42
-
43
-
44
-
45
-
 46
46 -
 47
47 -
 48
48 -
 49
49 -
 50
50 -
 51
51 -
 52
52 -
 53
53 -
 54
54 -
 55
55 -
 56
56 -
57
-
58
-
59
-
60
-
61
-
62
-
63
-
64
-
65
-
66
-
67
-
68
-
69
-
70
-
71
-
72
-
73
-
74
-
75
-
76
-
77
-
78
-
79
-
80
-
81
-
82
-
83
-
84
-
85
-
86
-
87
-
88
-
89
-
90
-
91
-
92
-
93
-
94
-
95
-
96
-
97
-
98
-
99
-
100
-
101
-
102
-
103
-
104
-
105
-
106
-
107
-
108
-
109
-
110
-
111
-
112
-
113
-
114
-
115
-
116
-
117
-
118
-
119
-
120
-
121
-
122
 |
 |
