HP Vectra XM 5/xxx HP Vectra XM 5/xxx Series 3 - User Guide - Page 61
Installing a 3.5-inch Device in the Bottom Shelf
 |
View all HP Vectra XM 5/xxx manuals
Add to My Manuals
Save this manual to your list of manuals |
Page 61 highlights
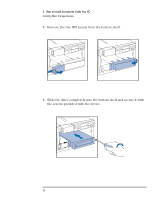
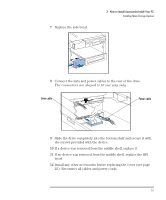
NOTE 3 How to Install Accessories Inside Your PC Installing Mass Storage Devices Installing a 3.5-inch Device in the Bottom Shelf A slim (1-inch high) 3.5-inch front access drive can be installed in the bottom shelf. Disk drives ordered from HP are supplied with mounting rails. If you order your drive from another supplier, you will need to order drive mounting rails from HP. You should order product number D3566A (3.5-inch disk drive rails). 1 Disconnect the computer's power supply cord. 2 Remove the computer's cover (see page 24). 3 If there is a device in the middle shelf, remove it. 4 If there is no device in the middle shelf, remove the RFI bezel. English 49
-
 1
1 -
2
-
3
-
4
-
5
-
6
-
7
-
8
-
9
-
10
-
11
-
12
-
13
-
14
-
15
-
16
-
17
-
18
-
19
-
20
-
21
-
22
-
23
-
24
-
25
-
26
-
27
-
28
-
29
-
30
-
31
-
32
-
33
-
34
-
35
-
36
-
37
-
38
-
39
-
40
-
41
-
42
-
43
-
44
-
45
-
46
-
47
-
48
-
49
-
50
-
51
-
52
-
53
-
54
-
55
-
 56
56 -
 57
57 -
 58
58 -
 59
59 -
 60
60 -
 61
61 -
 62
62 -
 63
63 -
 64
64 -
 65
65 -
 66
66 -
67
-
68
-
69
-
70
-
71
-
72
-
73
-
74
-
75
-
76
-
77
-
78
-
79
-
80
-
81
-
82
-
83
-
84
-
85
-
86
-
87
-
88
-
89
-
90
-
91
-
92
-
93
-
94
-
95
-
96
-
97
-
98
-
99
-
100
-
101
-
102
-
103
-
104
-
105
-
106
-
107
-
108
-
109
-
110
-
111
-
112
-
113
-
114
-
115
-
116
-
117
-
118
-
119
-
120
-
121
-
122
 |
 |

English
49
3
How to Install Accessories Inside Your PC
Installing Mass Storage Devices
Installing a 3.5-inch Device in the Bottom Shelf
A slim (1-inch high) 3.5-inch front access drive can be installed in the
bottom shelf.
NOTE
Disk drives ordered from HP are supplied with mounting rails. If you
order your drive from another supplier, you will need to order drive
mounting rails from HP.
You should order product number D3566A (3.5-inch disk drive rails).
1
Disconnect the computer’s power supply cord.
2
Remove the computer’s cover (see page
24).
3
If there is a device in the middle shelf, remove it.
4
If there is no device in the middle shelf, remove the RFI bezel.