HP XM600 hp kayak xm600 series 1, user's guide for desktop models - Page 39
Replacing the CD-ROM Drive (or DVD-Drive
 |
View all HP XM600 manuals
Add to My Manuals
Save this manual to your list of manuals |
Page 39 highlights
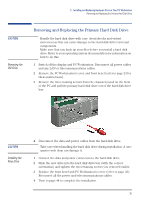
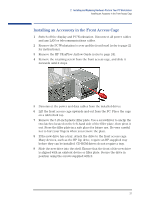
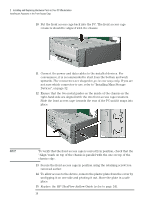
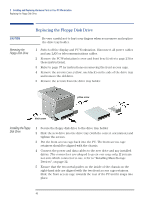
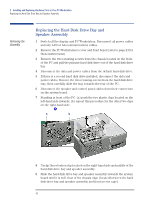
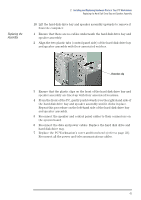
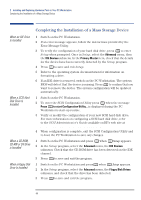
2 Installing and Replacing Hardware Parts in Your PC Workstation Replacing the CD-ROM Drive (or DVD-Drive) 16 Replace the front bezel and PC Workstation's cover (refer to page 23). Reconnect all the power and telecommunications cables. 17 Turn to page 44 to complete the installation. Removing the Old Drive Installing the New Drive NOTE Replacing the CD-ROM Drive (or DVD-Drive) 1 Switch off the display and PC Workstation. Disconnect all power cables and any LAN or telecommunications cables. 2 Remove the PC Workstation's cover and front bezel (refer to page 23 for these instructions). 3 Refer to page 37 for instruction on removing the front access cage. 1 Slide the new drive into the drive tray (with the correct orientation). Ensure that the front of the new drive is aligned with an existent device or filler plate. Secure the drive in position. 2 Put the front access cage back into the PC. The front access cage retainers should be aligned with the chassis. 3 Connect the power and data cables to the new drive and any installed drives. The connectors are shaped to go in one way only. 4 Ensure that the two metal guides on the inside of the chassis on the right-hand side are aligned with the two front access cage retainers. Slide the front access cage towards the rear of the PC until it snaps into place. To verify that the front access cage is correctly in position, check that the "Align" mark on top of the chassis is parallel with the one on top of the chassis edge. 5 Secure the front access cage in position using the retaining screw you removed earlier. 6 Ensure that the data and power cables are neatly routed so that they do not interfere with any other device or hinder the PC Workstation's cover. 7 Replace the HP UltraFlow Airflow Guide (refer to page 24). 8 Replace the front bezel and PC Workstation's cover (refer to page 23). Reconnect all the power and telecommunications cables. 9 Turn to page 44 to complete the installation. 39
-
 1
1 -
2
-
3
-
4
-
5
-
6
-
7
-
8
-
9
-
10
-
11
-
12
-
13
-
14
-
15
-
16
-
17
-
18
-
19
-
20
-
21
-
22
-
23
-
24
-
25
-
26
-
27
-
28
-
29
-
30
-
31
-
32
-
33
-
 34
34 -
 35
35 -
 36
36 -
 37
37 -
 38
38 -
 39
39 -
 40
40 -
 41
41 -
 42
42 -
 43
43 -
 44
44 -
45
-
46
-
47
-
48
-
49
-
50
-
51
-
52
-
53
-
54
-
55
-
56
-
57
-
58
-
59
-
60
-
61
-
62
-
63
-
64
-
65
-
66
-
67
-
68
-
69
-
70
-
71
-
72
-
73
-
74
-
75
-
76
-
77
-
78
-
79
-
80
-
81
-
82
-
83
-
84
 |
 |