HP rp7405 User Guide, Third Edition - hp rp7405/rp7410 Servers - Page 108
Replacing the Backplane, Step 1.
 |
View all HP rp7405 manuals
Add to My Manuals
Save this manual to your list of manuals |
Page 108 highlights
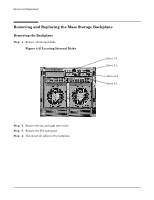
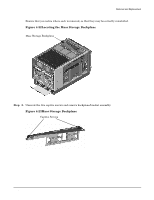
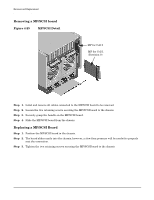
Removal and Replacement Removing and Replacing the Mass Storage Backplane Replacing the Backplane Step 1. Align and press the backplane/bracket assembly into its mount. Step 2. Fasten the two captive screws. Step 3. Connect all cables to the backplane. Step 4. Install the PCI side panel. Step 5. Install the top and right side covers. Step 6. Install all internal disks. 86 Chapter 4
-
 1
1 -
2
-
3
-
4
-
5
-
6
-
7
-
8
-
9
-
10
-
11
-
12
-
13
-
14
-
15
-
16
-
17
-
18
-
19
-
20
-
21
-
22
-
23
-
24
-
25
-
26
-
27
-
28
-
29
-
30
-
31
-
32
-
33
-
34
-
35
-
36
-
37
-
38
-
39
-
40
-
41
-
42
-
43
-
44
-
45
-
46
-
47
-
48
-
49
-
50
-
51
-
52
-
53
-
54
-
55
-
56
-
57
-
58
-
59
-
60
-
61
-
62
-
63
-
64
-
65
-
66
-
67
-
68
-
69
-
70
-
71
-
72
-
73
-
74
-
75
-
76
-
77
-
78
-
79
-
80
-
81
-
82
-
83
-
84
-
85
-
86
-
87
-
88
-
89
-
90
-
91
-
92
-
93
-
94
-
95
-
96
-
97
-
98
-
99
-
100
-
101
-
102
-
 103
103 -
 104
104 -
 105
105 -
 106
106 -
 107
107 -
 108
108 -
 109
109 -
 110
110 -
 111
111 -
 112
112 -
 113
113 -
114
-
115
-
116
-
117
-
118
-
119
-
120
-
121
-
122
-
123
-
124
-
125
-
126
-
127
-
128
-
129
-
130
-
131
-
132
-
133
-
134
-
135
-
136
-
137
-
138
-
139
-
140
-
141
-
142
-
143
-
144
-
145
-
146
 |
 |

Chapter 4
Removal and Replacement
Removing and Replacing the Mass Storage Backplane
86
Replacing the Backplane
Step 1.
Align and press the backplane/bracket assembly into its mount.
Step 2.
Fasten the two captive screws.
Step 3.
Connect all cables to the backplane.
Step 4.
Install the PCI side panel.
Step 5.
Install the top and right side covers.
Step 6.
Install all internal disks.