HP rp7405 User Guide, Third Edition - hp rp7405/rp7410 Servers - Page 86
Removing a Disk Drive, Disk Drive Detail, Disk Drive Detail
 |
View all HP rp7405 manuals
Add to My Manuals
Save this manual to your list of manuals |
Page 86 highlights
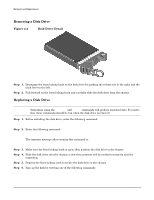
Removal and Replacement Removing and Replacing a Disk Drive Removing a Disk Drive Figure 4-4 Disk Drive Detail Step 1. Disengage the front locking latch on the disk drive by pushing the release tab to the right and the latch lever to the left. Step 2. Pull forward on the front locking latch and carefully slide the disk drive from the chassis. Replacing a Disk Drive NOTE Sometimes using the diskinfo and ioscan commands will produce encached data. To resolve this, these commands should be run when the disk drive is removed. Step 1. Before installing the disk drive, enter the following command: #diskinfo -v /dev/rdsk/cxtxdx Step 2. Enter the following command: #ioscan -f The response message after running this command is: NO_HW Step 3. Make sure the front locking latch is open, then position the disk drive in the chassis. Step 4. Slide the disk drive into the chassis; a slow firm pressure will be needed to properly seat the connection. Step 5. Depress the front locking latch to secure the disk drive in the chassis. Step 6. Spin up the disk by entering one of the following commands: #diskinfo -v /dev/rdsk/cxtxdx #ioscan -f 64 Chapter 4
-
 1
1 -
2
-
3
-
4
-
5
-
6
-
7
-
8
-
9
-
10
-
11
-
12
-
13
-
14
-
15
-
16
-
17
-
18
-
19
-
20
-
21
-
22
-
23
-
24
-
25
-
26
-
27
-
28
-
29
-
30
-
31
-
32
-
33
-
34
-
35
-
36
-
37
-
38
-
39
-
40
-
41
-
42
-
43
-
44
-
45
-
46
-
47
-
48
-
49
-
50
-
51
-
52
-
53
-
54
-
55
-
56
-
57
-
58
-
59
-
60
-
61
-
62
-
63
-
64
-
65
-
66
-
67
-
68
-
69
-
70
-
71
-
72
-
73
-
74
-
75
-
76
-
77
-
78
-
79
-
80
-
 81
81 -
 82
82 -
 83
83 -
 84
84 -
 85
85 -
 86
86 -
 87
87 -
 88
88 -
 89
89 -
 90
90 -
 91
91 -
92
-
93
-
94
-
95
-
96
-
97
-
98
-
99
-
100
-
101
-
102
-
103
-
104
-
105
-
106
-
107
-
108
-
109
-
110
-
111
-
112
-
113
-
114
-
115
-
116
-
117
-
118
-
119
-
120
-
121
-
122
-
123
-
124
-
125
-
126
-
127
-
128
-
129
-
130
-
131
-
132
-
133
-
134
-
135
-
136
-
137
-
138
-
139
-
140
-
141
-
142
-
143
-
144
-
145
-
146
 |
 |
