HP rp7405 User Guide, Third Edition - hp rp7405/rp7410 Servers - Page 63
The lc Command Screen, MP Core I/O Connections
 |
View all HP rp7405 manuals
Add to My Manuals
Save this manual to your list of manuals |
Page 63 highlights
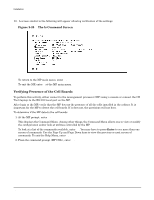
Enter lc and press the Return key. The following screen appears: Figure 2-24 The lc Command Screen Installation MP Core I/O Connections NOTE The value in the "IP address" field has been set at the factory. The customer must provide the actual LAN IP address. 2. At the prompt, Do you want to modify the configuration for the customer LAN?, enter y. The current IP address is shown; then the following prompt appears: Do you want to modify it? (Y/[N]) 3. Enter y. 4. Enter the new IP address. The customer shall provide this address for network interface 0. 5. Confirm the new address. 6. Enter the MP Network name. This is the host name for the customer LAN. The name can be as many as 64 characters, and include alpha numerics, - (dash), _ (under bar),. (period), or a space. It is recommended that the name be a derivative of the complex name. For example, Acme.com_MP. 7. Enter the LAN parameters for Subnet mask and Gateway address. This information shall come from the customer. 8. Once step 7 is completed, the system will indicate the parameters have been updated and return to the MP Command Menu prompt (MP:CM>) 9. To check the LAN parameters and status, enter the ls command at the MP Command Menu prompt (MP:CM>). Chapter 2 41
-
 1
1 -
2
-
3
-
4
-
5
-
6
-
7
-
8
-
9
-
10
-
11
-
12
-
13
-
14
-
15
-
16
-
17
-
18
-
19
-
20
-
21
-
22
-
23
-
24
-
25
-
26
-
27
-
28
-
29
-
30
-
31
-
32
-
33
-
34
-
35
-
36
-
37
-
38
-
39
-
40
-
41
-
42
-
43
-
44
-
45
-
46
-
47
-
48
-
49
-
50
-
51
-
52
-
53
-
54
-
55
-
56
-
57
-
 58
58 -
 59
59 -
 60
60 -
 61
61 -
 62
62 -
 63
63 -
 64
64 -
 65
65 -
 66
66 -
 67
67 -
 68
68 -
69
-
70
-
71
-
72
-
73
-
74
-
75
-
76
-
77
-
78
-
79
-
80
-
81
-
82
-
83
-
84
-
85
-
86
-
87
-
88
-
89
-
90
-
91
-
92
-
93
-
94
-
95
-
96
-
97
-
98
-
99
-
100
-
101
-
102
-
103
-
104
-
105
-
106
-
107
-
108
-
109
-
110
-
111
-
112
-
113
-
114
-
115
-
116
-
117
-
118
-
119
-
120
-
121
-
122
-
123
-
124
-
125
-
126
-
127
-
128
-
129
-
130
-
131
-
132
-
133
-
134
-
135
-
136
-
137
-
138
-
139
-
140
-
141
-
142
-
143
-
144
-
145
-
146
 |
 |
