HP xp8000 HP L1581A advanced connectivity module - (English) User Guide - Page 10
Setting Up the Module, To install the connectivity module
 |
View all HP xp8000 manuals
Add to My Manuals
Save this manual to your list of manuals |
Page 10 highlights
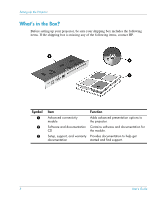
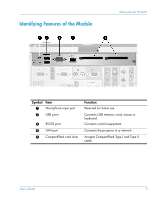
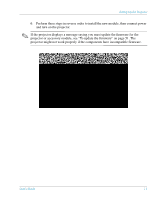
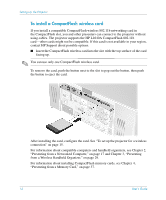
Setting Up the Projector Setting Up the Module This section describes how to set up the module. ■ "To install the connectivity module" on page 10 ■ "To install a CompactFlash wireless card" on page 12 ■ "To set up the projector for wired network access" on page 13 ■ "To set up the projector for a wireless connection" on page 15 To install the connectivity module 1. Turn off the projector and, after it cools, unplug the power cord. 2. Open the lid 1, then remove the screw directly behind the back infrared receiver 2. 3. Loosen the two thumb screws 3 from the faceplate of the connectivity module. 4. Pull on the two thumb screws until the module releases from the projector 4. 5. Remove the old connectivity module from the back of the projector and install the new connectivity module. 10 User's Guide
-
 1
1 -
2
-
3
-
4
-
 5
5 -
 6
6 -
 7
7 -
 8
8 -
 9
9 -
 10
10 -
 11
11 -
 12
12 -
 13
13 -
 14
14 -
 15
15 -
16
-
17
-
18
-
19
-
20
-
21
-
22
-
23
-
24
-
25
-
26
-
27
-
28
-
29
-
30
-
31
-
32
-
33
-
34
-
35
-
36
-
37
-
38
-
39
-
40
-
41
-
42
-
43
-
44
-
45
-
46
-
47
-
48
-
49
-
50
-
51
-
52
-
53
-
54
-
55
-
56
-
57
-
58
-
59
-
60
-
61
-
62
-
63
-
64
-
65
-
66
-
67
-
68
-
69
-
70
-
71
-
72
 |
 |