HP xp8000 HP L1581A advanced connectivity module - (English) User Guide - Page 16
Help > About the network, Enter, Networking > Wireless Settings, Ad Hoc, Network ID SSID
 |
View all HP xp8000 manuals
Add to My Manuals
Save this manual to your list of manuals |
Page 16 highlights
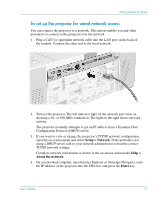
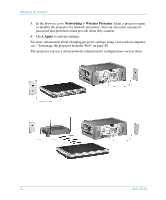
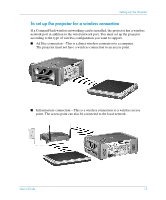
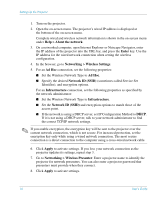
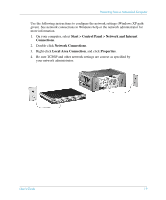
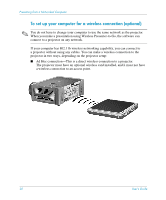
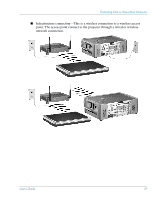
Setting Up the Projector 1. Turn on the projector. 2. Open the on-screen menu. The projector's wired IP address is displayed at the bottom of the on-screen menu. Complete wired and wireless network information is shown in the on-screen menu under Help > About the network. 3. On a networked computer, open Internet Explorer or Netscape Navigator, enter the IP address of the projector into the URL bar, and press the Enter key. Use the IP address for the wired network connection when setting the wireless configuration. 4. In the browser, go to Networking > Wireless Settings. 5. For an Ad Hoc connection, set the following properties: ■ Set the Wireless Network Type to Ad Hoc. ■ Specify the desired Network ID (SSID) (sometimes called Service Set Identifier), and encryption options. For an Infrastructure connection, set the following properties as specified by the network administrator: ■ Set the Wireless Network Type to Infrastructure. ■ Set the Network ID (SSID) and encryption options to match those of the access point. ■ If the network is using a DHCP server, set IP Configuration Method to DHCP. If it is not using a DHCP server, talk to your network administrator to find the correct TCP/IP network settings. ✎ If you enable encryption, the encryption key will be sent to the projector over the current network connection, which is not secure. For increased protection, set the encryption key only while using a wired network connection. The most secure connection is a direct connection to the computer using a cross-wired network cable. 6. Click Apply to activate settings. If you lose your network connection as the projector updates its settings, repeat step 3. 7. Go to Networking > Wireless Presenter. Enter a projector name to identify the projector for network presenters. You can also enter a projector password that presenters must provide when they connect. 8. Click Apply to activate settings. 16 User's Guide
-
 1
1 -
2
-
3
-
4
-
5
-
6
-
7
-
8
-
9
-
10
-
 11
11 -
 12
12 -
 13
13 -
 14
14 -
 15
15 -
 16
16 -
 17
17 -
 18
18 -
 19
19 -
 20
20 -
 21
21 -
22
-
23
-
24
-
25
-
26
-
27
-
28
-
29
-
30
-
31
-
32
-
33
-
34
-
35
-
36
-
37
-
38
-
39
-
40
-
41
-
42
-
43
-
44
-
45
-
46
-
47
-
48
-
49
-
50
-
51
-
52
-
53
-
54
-
55
-
56
-
57
-
58
-
59
-
60
-
61
-
62
-
63
-
64
-
65
-
66
-
67
-
68
-
69
-
70
-
71
-
72
 |
 |