Huawei Mate User Guide - Page 128
Managing VIP contacts, Managing email accounts, Adding an email account, Switching between email
 |
View all Huawei Mate manuals
Add to My Manuals
Save this manual to your list of manuals |
Page 128 highlights
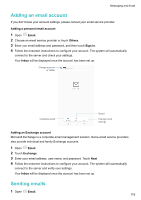
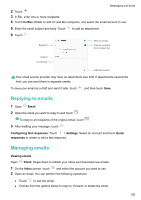
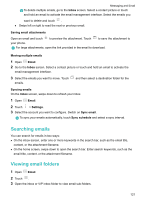
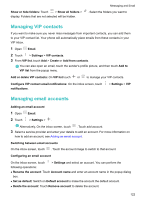
Show or hide folders: Touch > Show all folders > display. Folders that are not selected will be hidden. Messaging and Email . Select the folders you want to Managing VIP contacts If you want to make sure you never miss messages from important contacts, you can add them to your VIP contact list. Your phone will automatically place emails from these contacts in your VIP inbox. 1 Open Email. 2 Touch > Settings > VIP contacts. 3 From VIP list, touch Add > Create or Add from contacts. You can also open an email, touch the sender's profile picture, and then touch Add to VIP list from the popup menu. Add or delete VIP contacts: On VIP list touch or to manage your VIP contacts. Configure VIP contact email notifications: On the inbox screen, touch notifications. > Settings > VIP Managing email accounts Adding an email account 1 Open Email. 2 Touch > Settings > . Alternatively, On the inbox screen, touch . Touch add account. 3 Select a service provider and enter your details to add an account. For more information on how to add an account, see Adding an email account. Switching between email accounts On the inbox screen, touch . Touch the account image to switch to that account. Configuring an email account On the inbox screen, touch > Settings and select an account. You can perform the following operations: l Rename the account: Touch Account name and enter an account name in the popup dialog box. l Set as default: Switch on Default account to make the account the default account. l Delete the account: Touch Remove account to delete the account. 122
-
 1
1 -
2
-
3
-
4
-
5
-
6
-
7
-
8
-
9
-
10
-
11
-
12
-
13
-
14
-
15
-
16
-
17
-
18
-
19
-
20
-
21
-
22
-
23
-
24
-
25
-
26
-
27
-
28
-
29
-
30
-
31
-
32
-
33
-
34
-
35
-
36
-
37
-
38
-
39
-
40
-
41
-
42
-
43
-
44
-
45
-
46
-
47
-
48
-
49
-
50
-
51
-
52
-
53
-
54
-
55
-
56
-
57
-
58
-
59
-
60
-
61
-
62
-
63
-
64
-
65
-
66
-
67
-
68
-
69
-
70
-
71
-
72
-
73
-
74
-
75
-
76
-
77
-
78
-
79
-
80
-
81
-
82
-
83
-
84
-
85
-
86
-
87
-
88
-
89
-
90
-
91
-
92
-
93
-
94
-
95
-
96
-
97
-
98
-
99
-
100
-
101
-
102
-
103
-
104
-
105
-
106
-
107
-
108
-
109
-
110
-
111
-
112
-
113
-
114
-
115
-
116
-
117
-
118
-
119
-
120
-
121
-
122
-
 123
123 -
 124
124 -
 125
125 -
 126
126 -
 127
127 -
 128
128 -
 129
129 -
 130
130 -
 131
131 -
 132
132 -
 133
133 -
134
-
135
-
136
-
137
-
138
-
139
-
140
-
141
-
142
-
143
-
144
-
145
-
146
-
147
-
148
-
149
-
150
-
151
-
152
-
153
-
154
-
155
-
156
-
157
-
158
-
159
-
160
-
161
-
162
-
163
-
164
-
165
-
166
-
167
-
168
-
169
-
170
-
171
-
172
-
173
-
174
-
175
-
176
-
177
-
178
-
179
-
180
-
181
-
182
-
183
-
184
-
185
-
186
-
187
-
188
-
189
-
190
-
191
-
192
-
193
-
194
-
195
-
196
-
197
-
198
-
199
-
200
-
201
-
202
-
203
-
204
-
205
 |
 |