IBM x3550 Installation Guide - Page 27
Installing, drive
 |
UPC - 883436027151
View all IBM x3550 manuals
Add to My Manuals
Save this manual to your list of manuals |
Page 27 highlights
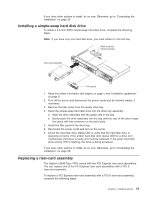
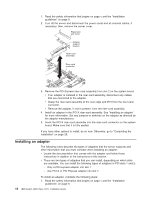
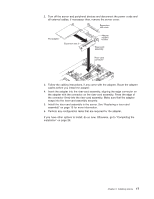
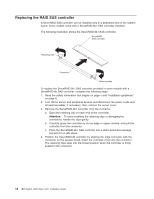
4. To remove the air baffle near the center of the server, complete the following steps: Air baffle Cable routing slot Baffle pins Baffle mounting holes a. Slide the baffle back from the front of the server to disengage the tab at the front of the baffle from the bulkhead that runs the width of the server. b. Lift the baffle up slightly, making sure that the pins come out of the holes on the system board. c. Slide the cables out of the cable routing slot. Make sure that you do not disconnect or loosen the cables. d. Lift the baffle out completely. Attention: For proper cooling and airflow, replace the air baffle before you turn on the server. Operating the server with the air baffle removed might damage server components. Installing a hard disk drive Locate the documentation that comes with the hard disk drive and follow those instructions in addition to the instructions in this chapter. Note: Do not mix SAS hard disk drives with SATA hard disk drives. The following notes describe the type of hard disk drives that the server supports and other information that you must consider when installing a hard disk drive. For a list of supported hard disk drives, see http://www.ibm.com/servers/eserver/ serverproven/compat/us/. The server supports one of the following hard disk drive configurations: v Servers with four hot-swap bays support 2.5-inch hot-swap SAS hard disk drives. You can install only 2.5-inch hot-swap SAS drives in these servers. v Servers with two hot-swap bays support 3.5-inch hot-swap SAS or 3.5-inch hot-swap SATA hard disk drives. You can install only 3.5-inch hot-swap SAS or hot-swap SATA drives in these servers. Chapter 2. Installing options 13
-
 1
1 -
2
-
3
-
4
-
5
-
6
-
7
-
8
-
9
-
10
-
11
-
12
-
13
-
14
-
15
-
16
-
17
-
18
-
19
-
20
-
21
-
 22
22 -
 23
23 -
 24
24 -
 25
25 -
 26
26 -
 27
27 -
 28
28 -
 29
29 -
 30
30 -
 31
31 -
 32
32 -
33
-
34
-
35
-
36
-
37
-
38
-
39
-
40
-
41
-
42
-
43
-
44
-
45
-
46
-
47
-
48
-
49
-
50
-
51
-
52
-
53
-
54
-
55
-
56
-
57
-
58
-
59
-
60
-
61
-
62
-
63
-
64
-
65
-
66
-
67
-
68
-
69
-
70
-
71
-
72
-
73
-
74
-
75
-
76
-
77
-
78
-
79
-
80
-
81
-
82
-
83
-
84
-
85
-
86
-
87
-
88
-
89
-
90
-
91
-
92
-
93
-
94
-
95
-
96
-
97
-
98
-
99
-
100
-
101
-
102
 |
 |
