IBM x3550 Installation Guide - Page 33
Installing, memory, module - memory configuration
 |
UPC - 883436027151
View all IBM x3550 manuals
Add to My Manuals
Save this manual to your list of manuals |
Page 33 highlights
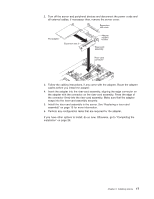
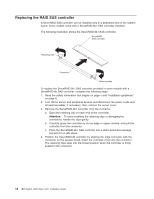
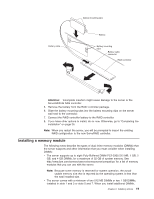
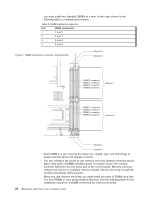
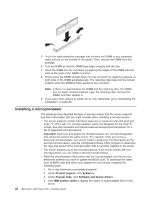
Battery cable Battery mounting tabs Battery Battery mounting clips Battery cable connector RAID controller Attention: Incomplete insertion might cause damage to the server or the ServeRAID-8k SAS controller. 5. Remove the battery from the RAID controller package. 6. Slide the battery mounting tabs into the battery mounting clips on the server wall next to the connector. 7. Connect the RAID controller battery to the RAID controller. 8. If you have other options to install, do so now. Otherwise, go to "Completing the installation" on page 26. Note: When you restart the server, you will be prompted to import the existing RAID configuration to the new ServeRAID controller. Installing a memory module The following notes describe the types of dual inline memory modules (DIMMs) that the server supports and other information that you must consider when installing DIMMs: v The server supports up to eight Fully Buffered DIMM PC2-5300 512 MB, 1 GB, 2 GB, and 4 GB DIMMs, for a maximum of 32 GB of system memory. See http://www.ibm.com/servers/eserver/serverproven/compat/us/ for a list of memory modules that you can use with the server. Note: Because some memory is reserved for system operation, the actual usable memory size that is reported by the operating system is less than the total installed size. v The server comes with a minimum of two 512 MB DIMMs or two 1 GB DIMMs, installed in slots 1 and 3 or slots 5 and 7. When you install additional DIMMs, Chapter 2. Installing options 19
-
 1
1 -
2
-
3
-
4
-
5
-
6
-
7
-
8
-
9
-
10
-
11
-
12
-
13
-
14
-
15
-
16
-
17
-
18
-
19
-
20
-
21
-
22
-
23
-
24
-
25
-
26
-
27
-
 28
28 -
 29
29 -
 30
30 -
 31
31 -
 32
32 -
 33
33 -
 34
34 -
 35
35 -
 36
36 -
 37
37 -
 38
38 -
39
-
40
-
41
-
42
-
43
-
44
-
45
-
46
-
47
-
48
-
49
-
50
-
51
-
52
-
53
-
54
-
55
-
56
-
57
-
58
-
59
-
60
-
61
-
62
-
63
-
64
-
65
-
66
-
67
-
68
-
69
-
70
-
71
-
72
-
73
-
74
-
75
-
76
-
77
-
78
-
79
-
80
-
81
-
82
-
83
-
84
-
85
-
86
-
87
-
88
-
89
-
90
-
91
-
92
-
93
-
94
-
95
-
96
-
97
-
98
-
99
-
100
-
101
-
102
 |
 |
