Icom ID-52A Advanced Manual english - Page 226
Preparing a TX picture, Transfer from the mobile device through Bluetooth
 |
View all Icom ID-52A manuals
Add to My Manuals
Save this manual to your list of manuals |
Page 226 highlights
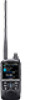
14 SHARE PICTURES FUNCTION Preparing a TX picture There are 2 ways to prepare a TX picture. •• Transfer from a mobile device using the Picture Utility software, through Bluetooth. •• Save on a microSD card using the PC or mobile device. DDTransfer from the mobile device through Bluetooth 1. Insert a microSD card into the transceiver's slot, and then turn ON the transceiver. 2. In the mobile device, open the Picture Utility software. LLWhen using an Android device for the first time, pair the transceiver with your device. (p. 17-7) 3. Open the Transfer Settings screen. 4. Select "Using Bluetooth," and then set "Transfer Devices" to your transceiver. LLWhen using an iOS device for the first time, pair the transceiver with your device. (p. 17-9) LLSee the ST-4001A or ST-4001I instruction manual for details. They can be downloaded from the Icom website. 5. Open a picture to transfer using the Picture Utility software. 6. Touch the Transfer ( ) button. •• Starts transferring, and the transferred picture is saved on the microSD card. LLThe file name is automatically set in the following format: yyyymmdd_hhmmss (yyyy: Year, mm: month, dd: day, hh: hour, mm: minute, ss: second). DDSave on the microSD card using the PC or mobile device 1. Turn OFF the transceiver, then remove the microSD card from the transceiver. 2. Insert it into the microSD card drive or a memory card reader* on your PC or mobile device. * User supplied. 3. Copy a picture file, and paste it in the "Picture" folder ("ID-52" > "Picture") on the card. 4. Remove the card from your device, and insert it into the transceiver's slot. NOTE: Before you remove the SD card, be sure to electrically unmount it. Otherwise, the data may be corrupted or deleted. TIP: •• When "USB Connect" is set to "SD Card Mode," and the transceiver is connected to the PC through a USB data cable, you can directly access the microSD card that is set in the transceiver from the PC. ([MENU] > SET > Function > USB Connect) •• You can save a received picture in the "Picture" folder on the SD card. (p. 14-7) NOTE: If you cannot transfer the picture, check the following: On the transceiver •• The transceiver is turned ON. •• The Bluetooth function is ON. •• The transceiver's firmware is the latest version. •• A microSD card is inserted into the transceiver. •• The transceiver is in a normal operating mode. LLThe transceiver cannot receive the picture in special modes, such as the firmware update mode, clone mode, setting save mode, and import or export mode. On the device •• The Bluetooth function is ON. •• "Transfer Devices" is set to your transceiver. 14-4
-
 1
1 -
2
-
3
-
4
-
5
-
6
-
7
-
8
-
9
-
10
-
11
-
12
-
13
-
14
-
15
-
16
-
17
-
18
-
19
-
20
-
21
-
22
-
23
-
24
-
25
-
26
-
27
-
28
-
29
-
30
-
31
-
32
-
33
-
34
-
35
-
36
-
37
-
38
-
39
-
40
-
41
-
42
-
43
-
44
-
45
-
46
-
47
-
48
-
49
-
50
-
51
-
52
-
53
-
54
-
55
-
56
-
57
-
58
-
59
-
60
-
61
-
62
-
63
-
64
-
65
-
66
-
67
-
68
-
69
-
70
-
71
-
72
-
73
-
74
-
75
-
76
-
77
-
78
-
79
-
80
-
81
-
82
-
83
-
84
-
85
-
86
-
87
-
88
-
89
-
90
-
91
-
92
-
93
-
94
-
95
-
96
-
97
-
98
-
99
-
100
-
101
-
102
-
103
-
104
-
105
-
106
-
107
-
108
-
109
-
110
-
111
-
112
-
113
-
114
-
115
-
116
-
117
-
118
-
119
-
120
-
121
-
122
-
123
-
124
-
125
-
126
-
127
-
128
-
129
-
130
-
131
-
132
-
133
-
134
-
135
-
136
-
137
-
138
-
139
-
140
-
141
-
142
-
143
-
144
-
145
-
146
-
147
-
148
-
149
-
150
-
151
-
152
-
153
-
154
-
155
-
156
-
157
-
158
-
159
-
160
-
161
-
162
-
163
-
164
-
165
-
166
-
167
-
168
-
169
-
170
-
171
-
172
-
173
-
174
-
175
-
176
-
177
-
178
-
179
-
180
-
181
-
182
-
183
-
184
-
185
-
186
-
187
-
188
-
189
-
190
-
191
-
192
-
193
-
194
-
195
-
196
-
197
-
198
-
199
-
200
-
201
-
202
-
203
-
204
-
205
-
206
-
207
-
208
-
209
-
210
-
211
-
212
-
213
-
214
-
215
-
216
-
217
-
218
-
219
-
220
-
 221
221 -
 222
222 -
 223
223 -
 224
224 -
 225
225 -
 226
226 -
 227
227 -
 228
228 -
 229
229 -
 230
230 -
 231
231 -
232
-
233
-
234
-
235
-
236
-
237
-
238
-
239
-
240
-
241
-
242
-
243
-
244
-
245
-
246
-
247
-
248
-
249
-
250
-
251
-
252
-
253
-
254
-
255
-
256
-
257
-
258
-
259
-
260
-
261
-
262
-
263
 |
 |
