Kenwood MDX-F1 User Manual - Page 39
Moving a single track (TRACK MOVE), TRACK MOVE
 |
View all Kenwood MDX-F1 manuals
Add to My Manuals
Save this manual to your list of manuals |
Page 39 highlights
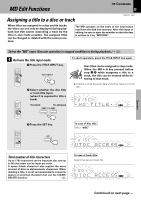
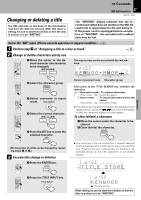
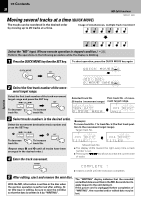
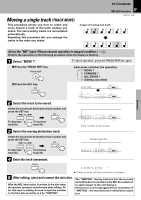
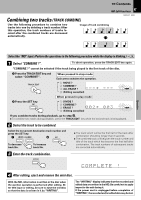
Moving a single track (TRACK MOVE) This procedure shows you how to select and move (insert) a track to the track number you desire. The surrounding tracks are renumbered automatically. Repeating this procedure lets you arrange the tracks in the order you desire. Contents MD Edit Functions 39 MDX-F1 (EN) Image of moving one track A B C D E F A C D E B F Select the "MD" input. (Please execute operation in stopped condition.) * Perform the operations in the following procedure while the display is blinking. 1 Select "MOVE ?". 1 Press the TRACK EDIT key. TRACK EDIT 2 Press the SET key. SET To abort operation, press the TRACK EDIT key again. Each press switches the operation. 1 MOVE ? 2 COMBINE ? 3 ALL ERASE ? 4 (Editing cancelled) MOVE ? MD EDIT Operation 2 Select the track to be moved. Select the movement destination track number and press the SET key. 4 P.CALL¢ SET To decrease track No. To increase track No. 3 Select the moving distination track. Select the movement destination track number and press the SET key. 4 P.CALL¢ SET ---=>--- ? MD EDIT 002=>--- ? MD EDIT Track number to be moved Moved track No. To decrease track No. To increase track No. 002=>005 ? MD EDIT 4 Enter the track movement. ENTER COMPLETE ! ÷ It takes a while until the execution completes. 5 After editing, eject and remove the mini disc. With the MD, information is written in the disc when the ejection operation is performed after editing. After title input or editing, be sure to eject the minidisc so that the data is written in it by "WRITING". The "WRITING" display indicates that the recorded and edited data are written in the MD. Be careful not to apply impact to the unit during it. If the power cord is unplugged before completion of "WRITING", the recorded and/or edited data may be lost.
-
 1
1 -
2
-
3
-
4
-
5
-
6
-
7
-
8
-
9
-
10
-
11
-
12
-
13
-
14
-
15
-
16
-
17
-
18
-
19
-
20
-
21
-
22
-
23
-
24
-
25
-
26
-
27
-
28
-
29
-
30
-
31
-
32
-
33
-
 34
34 -
 35
35 -
 36
36 -
 37
37 -
 38
38 -
 39
39 -
 40
40 -
 41
41 -
 42
42 -
 43
43 -
 44
44 -
45
-
46
-
47
-
48
-
49
-
50
-
51
-
52
-
53
-
54
-
55
-
56
 |
 |
