Konica Minolta bizhub C360 bizhub C220/C280/C360 Copy Operations User Guide - Page 146
Expert Adjustment]
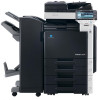 |
View all Konica Minolta bizhub C360 manuals
Add to My Manuals
Save this manual to your list of manuals |
Page 146 highlights
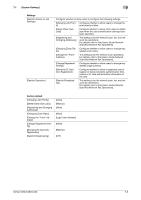
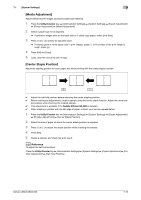
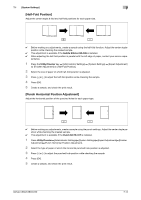
7.1 [System Settings] 7 7.1.7 [Expert Adjustment] Make adjustments so that output quality is increased. % Press the Utility/Counter key ö [Administrator Settings] ö [System Settings] ö [Expert Adjustment]. Settings [AE Level Adjustment] [Printer Adjustment] [Finisher Adjustment] Configure the initial value for AE (auto exposure). The higher the setting, the more that the original background is emphasized. Adjust the starting print position and defective print images caused by paper type features. d Reference The starting print position is factory-adjusted. Normally, you are not required to change the set values. [Leading Edge Adjustment] p. 7-12 [Centering] p. 7-12 [Leading Edge Adjustment (Du- p. 7-12 plex Side 2)] [Centering (Duplex 2nd Side)] p. 7-12 [Erase Leading Edge] Adjust leading edge erase width. For details on displaying this item, contact your service representative. [Vertical Adjustment] Adjust the feed direction zoom ratio of paper types. For details on displaying this item, contact your service representative. [Media Adjustment] p. 7-13 Adjust the staple, folding, and punch position of the Finisher FS-527. Otherwise, adjust where to place the paper alignment plate of the Finisher FS529. This item is displayed if the Finisher FS-527 or Finisher FS-529 is installed. d Reference Create a sample in advance, and then adjust them while checking the sample. [Center Staple Position] p. 7-13 [Half-Fold Position] p. 7-14 [Punch Horizontal Position Adjustment] p. 7-14 [Punch Regist Loop Size Adjust- p. 7-15 ment] [Paper Alignment Plate Settings] p. 7-15 bizhub C360/C280/C220 7-9
-
 1
1 -
2
-
3
-
4
-
5
-
6
-
7
-
8
-
9
-
10
-
11
-
12
-
13
-
14
-
15
-
16
-
17
-
18
-
19
-
20
-
21
-
22
-
23
-
24
-
25
-
26
-
27
-
28
-
29
-
30
-
31
-
32
-
33
-
34
-
35
-
36
-
37
-
38
-
39
-
40
-
41
-
42
-
43
-
44
-
45
-
46
-
47
-
48
-
49
-
50
-
51
-
52
-
53
-
54
-
55
-
56
-
57
-
58
-
59
-
60
-
61
-
62
-
63
-
64
-
65
-
66
-
67
-
68
-
69
-
70
-
71
-
72
-
73
-
74
-
75
-
76
-
77
-
78
-
79
-
80
-
81
-
82
-
83
-
84
-
85
-
86
-
87
-
88
-
89
-
90
-
91
-
92
-
93
-
94
-
95
-
96
-
97
-
98
-
99
-
100
-
101
-
102
-
103
-
104
-
105
-
106
-
107
-
108
-
109
-
110
-
111
-
112
-
113
-
114
-
115
-
116
-
117
-
118
-
119
-
120
-
121
-
122
-
123
-
124
-
125
-
126
-
127
-
128
-
129
-
130
-
131
-
132
-
133
-
134
-
135
-
136
-
137
-
138
-
139
-
140
-
 141
141 -
 142
142 -
 143
143 -
 144
144 -
 145
145 -
 146
146 -
 147
147 -
 148
148 -
 149
149 -
 150
150 -
 151
151 -
152
-
153
-
154
-
155
-
156
-
157
-
158
-
159
-
160
-
161
-
162
-
163
-
164
-
165
-
166
-
167
-
168
-
169
-
170
-
171
-
172
-
173
-
174
-
175
-
176
-
177
-
178
-
179
-
180
-
181
-
182
-
183
-
184
-
185
-
186
-
187
-
188
-
189
-
190
-
191
-
192
-
193
-
194
-
195
-
196
-
197
-
198
-
199
-
200
-
201
-
202
-
203
-
204
-
205
-
206
-
207
-
208
-
209
-
210
-
211
-
212
-
213
-
214
-
215
-
216
-
217
-
218
-
219
-
220
-
221
-
222
-
223
-
224
-
225
-
226
-
227
-
228
-
229
-
230
-
231
-
232
-
233
-
234
-
235
-
236
-
237
-
238
-
239
-
240
-
241
-
242
-
243
-
244
-
245
-
246
-
247
-
248
-
249
-
250
-
251
-
252
-
253
-
254
-
255
-
256
-
257
-
258
-
259
-
260
-
261
-
262
-
263
-
264
-
265
-
266
-
267
-
268
-
269
-
270
-
271
-
272
-
273
-
274
-
275
-
276
-
277
-
278
-
279
-
280
-
281
-
282
-
283
-
284
-
285
 |
 |
