Lenovo S200 Hardware Maintenance Manual - Page 158
snaps
 |
View all Lenovo S200 manuals
Add to My Manuals
Save this manual to your list of manuals |
Page 158 highlights
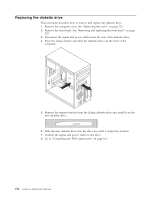
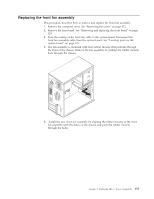
9. Align the drive cage pivot pin with the slot 1 in the upper drive cage and slide the hard disk drive into the chassis. 10. Press down on the metal latch 2 and pivot in the drive cage into place. Slide it forward until it snaps into position. Note: There are two arrows, one on the upper drive cage and one on the hard disk drive cage, that are aligned when the hard disk drive is in the proper position. 11. Connect the power and signal cables to the hard disk drive. 12. Go to "Completing the FRU replacement" on page 161. 152 Hardware Maintenance Manual
-
 1
1 -
2
-
3
-
4
-
5
-
6
-
7
-
8
-
9
-
10
-
11
-
12
-
13
-
14
-
15
-
16
-
17
-
18
-
19
-
20
-
21
-
22
-
23
-
24
-
25
-
26
-
27
-
28
-
29
-
30
-
31
-
32
-
33
-
34
-
35
-
36
-
37
-
38
-
39
-
40
-
41
-
42
-
43
-
44
-
45
-
46
-
47
-
48
-
49
-
50
-
51
-
52
-
53
-
54
-
55
-
56
-
57
-
58
-
59
-
60
-
61
-
62
-
63
-
64
-
65
-
66
-
67
-
68
-
69
-
70
-
71
-
72
-
73
-
74
-
75
-
76
-
77
-
78
-
79
-
80
-
81
-
82
-
83
-
84
-
85
-
86
-
87
-
88
-
89
-
90
-
91
-
92
-
93
-
94
-
95
-
96
-
97
-
98
-
99
-
100
-
101
-
102
-
103
-
104
-
105
-
106
-
107
-
108
-
109
-
110
-
111
-
112
-
113
-
114
-
115
-
116
-
117
-
118
-
119
-
120
-
121
-
122
-
123
-
124
-
125
-
126
-
127
-
128
-
129
-
130
-
131
-
132
-
133
-
134
-
135
-
136
-
137
-
138
-
139
-
140
-
141
-
142
-
143
-
144
-
145
-
146
-
147
-
148
-
149
-
150
-
151
-
152
-
 153
153 -
 154
154 -
 155
155 -
 156
156 -
 157
157 -
 158
158 -
 159
159 -
 160
160 -
 161
161 -
 162
162 -
 163
163 -
164
-
165
-
166
-
167
-
168
-
169
-
170
-
171
-
172
-
173
-
174
-
175
-
176
-
177
-
178
-
179
-
180
-
181
-
182
-
183
-
184
-
185
-
186
-
187
-
188
-
189
-
190
-
191
-
192
-
193
-
194
-
195
-
196
-
197
-
198
-
199
-
200
-
201
-
202
-
203
-
204
-
205
-
206
-
207
-
208
-
209
-
210
-
211
-
212
-
213
-
214
-
215
-
216
-
217
-
218
-
219
-
220
-
221
-
222
-
223
-
224
-
225
-
226
-
227
-
228
-
229
-
230
-
231
-
232
-
233
-
234
-
235
-
236
-
237
-
238
-
239
-
240
-
241
-
242
-
243
-
244
-
245
-
246
-
247
-
248
-
249
-
250
-
251
-
252
-
253
-
254
-
255
-
256
 |
 |

9.
Align
the
drive
cage
pivot
pin
with
the
slot
±1²
in
the
upper
drive
cage
and
slide
the
hard
disk
drive
into
the
chassis.
10.
Press
down
on
the
metal
latch
±2²
and
pivot
in
the
drive
cage
into
place.
Slide
it
forward
until
it
snaps
into
position.
Note:
There
are
two
arrows,
one
on
the
upper
drive
cage
and
one
on
the
hard
disk
drive
cage,
that
are
aligned
when
the
hard
disk
drive
is
in
the
proper
position.
11.
Connect
the
power
and
signal
cables
to
the
hard
disk
drive.
12.
Go
to
“Completing
the
FRU
replacement”
on
page
161.
152
Hardware
Maintenance
Manual