Lenovo ThinkPad T40p IBM System Information Center Administrator's Guide - Page 18
Administrator's - windows 10
 |
View all Lenovo ThinkPad T40p manuals
Add to My Manuals
Save this manual to your list of manuals |
Page 18 highlights
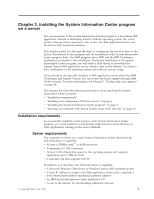
v Server name for asset scans: This is the name of the server. Example: http://servername/isic (where servername is the server name). v Administrator's e-mail address for reporting problems: The e-mail address of the administrator for reporting problems. 4. Click Next. The Action Authority Settings window opens. 5. With the Action Authority Settings window you can associate specific tasks with specific user accounts. Mark an appropriate user account (as described in the following list) for each of the tasks. Default settings are provided. You can restore defaults by clicking the Defaults button. v User: Works with asset information belonging only to the user. Can add assets, view asset history, compare and edit asset information and process an asset transfer request. v Super-User: Can perform all of the tasks of a User, plus more advanced functions such as developing specialized asset reports and viewing asset information across an enterprise. v Administrator: Can perform all of the tasks of a User and Super-User and have the ability to modify asset information across an enterprise, e-mail asset information, schedule asset scans, and approve asset requests. For more information on user accounts, see Chapter 4, "Using the System Information Center program," on page 21 6. Click Next. The Scheduling window opens. 7. In the Scheduling window, you have two scheduling options: v Under Client Agent Scheduling, mark the Automatically upload revised asset information check box if you want the client agent to automatically upload revisions of asset information. - Upload interval (days): Type the number of days for the interval between uploads. v Under Server Task Scheduling, mark the Automatically run specified reports and send e-mails check box if you want the server to automatically perform tasks on a set schedule. - Check for scheduled tasks every: Type the frequency that the server should check for scheduled tasks and then mark the appropriate option button for the value (minutes, hours, or days). - Specify the interval units to be used when scheduling tasks: Mark the appropriate option button (minutes/hours/days) to specify globally the interval unit to be used when setting a task's frequency. 8. Click Next. The Password Settings window opens. 9. In the Password Settings window you define how to manage and create user account passwords that are required to access the System Information Center program. v Under Password Control Settings, complete the following fields, if appropriate: - Encrypt passwords stored in the database: Mark this check box if you want passwords encrypted. If this setting is modified at a later date, all passwords will retain the encryption setting defined during the install until the passwords are changed. - Allow users to reuse passwords: Mark an option button to determine how often a user can reuse a password (always/never/after XX days, where XX signifies number of days after a password has expired). 10
-
 1
1 -
2
-
3
-
4
-
5
-
6
-
7
-
8
-
9
-
10
-
11
-
12
-
 13
13 -
 14
14 -
 15
15 -
 16
16 -
 17
17 -
 18
18 -
 19
19 -
 20
20 -
 21
21 -
 22
22 -
 23
23 -
24
-
25
-
26
-
27
-
28
-
29
-
30
-
31
-
32
-
33
-
34
-
35
-
36
-
37
-
38
-
39
-
40
-
41
-
42
-
43
-
44
-
45
-
46
-
47
-
48
-
49
-
50
-
51
-
52
-
53
-
54
-
55
-
56
-
57
-
58
-
59
-
60
-
61
-
62
-
63
-
64
-
65
-
66
-
67
-
68
-
69
-
70
-
71
-
72
-
73
-
74
-
75
-
76
-
77
-
78
-
79
-
80
-
81
-
82
-
83
-
84
-
85
-
86
-
87
-
88
-
89
-
90
-
91
-
92
-
93
-
94
-
95
-
96
-
97
-
98
-
99
-
100
-
101
-
102
-
103
-
104
-
105
-
106
-
107
-
108
 |
 |