Lenovo ThinkPad T40p IBM System Information Center Administrator's Guide - Page 32
Setting, account, privileges, Registering, asset, remote - usb
 |
View all Lenovo ThinkPad T40p manuals
Add to My Manuals
Save this manual to your list of manuals |
Page 32 highlights
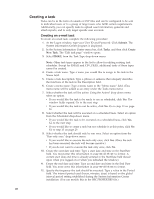
7. Click Submit. A progress bar is displayed, indicating that critical hardware and software information is being collected and is being sent to the database. When the operation is compete, the My Assets window opens. Setting user account privileges Only an Administrator account can set the authority for other user accounts. The types of privileges given to a user depends on the types of operations that user needs to accomplish. For information about the types of user accounts and the functions associated with each account, see "Understanding user accounts and functions" on page 21. To set the authority level of a user account, complete the following procedure: 1. At the Logon window, type your User ID and Password. Click Submit. The System Information Center program is displayed. 2. In the System Information Center menu bar, click Users. 3. Click All Users. 4. Mark the check box next to the user account you would like to alter. 5. In the System Information Center menu bar, click Users. 6. Click Edit. The ″Change details″ window opens. 7. Using the drop-down menu, select the authority level you would like to assign to the account (User, Super-User, or Administrator). 8. Click Submit. Registering an asset The ways to register an asset vary, depending on whether or not the asset has a connection to the System Information Center network. v You can register a remote asset; that is, a computer asset that is not connected to the network. v You can register an asset that is connected to the network. A user account must already be created if a user is going to upload an asset scan. Registering a remote asset To gather information from a remote asset, complete the following procedure: 1. Copy EGATHER2.EXE from D:\ISIC\web on the System Information Center server to some form of removable media (for example, diskette or USB memory key). 2. Insert the removable media into the remote client. 3. Use Windows Explorer to browse the media and double-click EGATHER2.EXE. A DOS window will open as the system is scanned for critical hardware and software information. 4. Once the scan is complete, a XXXX.EG2 file (where XXXX signifies a unique filename generated using the manufacturer, model, and serial number of the asset being scanned) will be created on the removable media. Note: Multiple assets can be scanned and the .EG2 files collected in this way. A typical .EG2 file will be approximately 110KB. To load the gathered information files with the System Information Center, two alternatives exist: 24
-
 1
1 -
2
-
3
-
4
-
5
-
6
-
7
-
8
-
9
-
10
-
11
-
12
-
13
-
14
-
15
-
16
-
17
-
18
-
19
-
20
-
21
-
22
-
23
-
24
-
25
-
26
-
 27
27 -
 28
28 -
 29
29 -
 30
30 -
 31
31 -
 32
32 -
 33
33 -
 34
34 -
 35
35 -
 36
36 -
 37
37 -
38
-
39
-
40
-
41
-
42
-
43
-
44
-
45
-
46
-
47
-
48
-
49
-
50
-
51
-
52
-
53
-
54
-
55
-
56
-
57
-
58
-
59
-
60
-
61
-
62
-
63
-
64
-
65
-
66
-
67
-
68
-
69
-
70
-
71
-
72
-
73
-
74
-
75
-
76
-
77
-
78
-
79
-
80
-
81
-
82
-
83
-
84
-
85
-
86
-
87
-
88
-
89
-
90
-
91
-
92
-
93
-
94
-
95
-
96
-
97
-
98
-
99
-
100
-
101
-
102
-
103
-
104
-
105
-
106
-
107
-
108
 |
 |
