Lenovo ThinkPad T420si (English) User Guide - Page 176
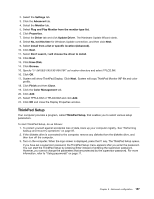
Startup menu, ThinkPad Setup.
 |
View all Lenovo ThinkPad T420si manuals
Add to My Manuals
Save this manual to your list of manuals |
Page 176 highlights
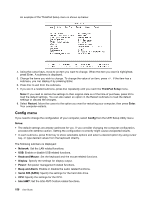
• Hard Disk 2 appears on the Password submenu only if a hard disk drive is installed in the Serial Ultrabay Slim. Note: You can install a 9.5-mm-thick Serial Ultrabay Slim device in the Serial Ultrabay Slim. If you select and enable Hardware Password Manager, you can manage your power-on password, supervisor password, and your hard disk passwords by the management server. By default, this is set to Enabled. Lock UEFI BIOS Settings enables or disables the function that protects items in the ThinkPad Setup from being changed by a user who does not have the supervisor password. By default, this is set to Disabled. If you set the supervisor password and enable this function, no one but you can change any items in the ThinkPad Setup. If you select Set Minimum Length, you can specify a minimum length for power-on passwords and hard disk passwords. By default, this is set to Disabled. If you set the supervisor password and specify a minimum length for passwords, no one but you can change the length. If you select and enable Password at unattended boot, a password prompt is displayed when the computer is turned on, from either a power-off state or hibernation, by an unattended event such as Wake on LAN. If you select Disabled, no password prompt is displayed; the computer goes ahead and loads the operating system. To prevent unauthorized access, set the user authentication on the operating system. If you select and enable Password at restart, a password prompt is displayed when you restart the computer. If you select Disabled, no password prompt is displayed; the computer goes ahead and loads the operating system. To prevent unauthorized access, set the user authentication on the operating system. Startup menu You may need to change the startup sequence of your computer. For example, if you have different operating systems on different devices, you can have the system start up from either of them. Attention: After you change your startup sequence, you must be extremely careful not to specify a wrong device during a copy, a save, or a format operation. If you specify a wrong device, your data and programs might be erased or overwritten. Attention: If you are using the BitLocker drive encryption, you should not change the startup sequence. BitLocker drive encryption detects the change of startup sequence and locks the computer from booting. Changing the startup sequence Selecting the Startup to display the boot submenu: To change the startup sequence, do the following: 1. Select Boot; then press Enter. • You can use the Boot submenu to specify the startup sequence that runs when you turn on the power. Refer to "Boot submenu" on page 161. • You can use the Network Boot to specify the top priority boot device that runs when Wake on LAN is commonly used by LAN administrators in corporate networks to get remote access to your computer. Refer to "Network Boot submenu" on page 161. 2. Select the device you want to start first. To set the order that the UEFI BIOS will use when starting an operating system, you can press the "-" or "+" key to move the device up or down. 3. Press F10 to save the changes and restart the system. 160 User Guide
-
 1
1 -
2
-
3
-
4
-
5
-
6
-
7
-
8
-
9
-
10
-
11
-
12
-
13
-
14
-
15
-
16
-
17
-
18
-
19
-
20
-
21
-
22
-
23
-
24
-
25
-
26
-
27
-
28
-
29
-
30
-
31
-
32
-
33
-
34
-
35
-
36
-
37
-
38
-
39
-
40
-
41
-
42
-
43
-
44
-
45
-
46
-
47
-
48
-
49
-
50
-
51
-
52
-
53
-
54
-
55
-
56
-
57
-
58
-
59
-
60
-
61
-
62
-
63
-
64
-
65
-
66
-
67
-
68
-
69
-
70
-
71
-
72
-
73
-
74
-
75
-
76
-
77
-
78
-
79
-
80
-
81
-
82
-
83
-
84
-
85
-
86
-
87
-
88
-
89
-
90
-
91
-
92
-
93
-
94
-
95
-
96
-
97
-
98
-
99
-
100
-
101
-
102
-
103
-
104
-
105
-
106
-
107
-
108
-
109
-
110
-
111
-
112
-
113
-
114
-
115
-
116
-
117
-
118
-
119
-
120
-
121
-
122
-
123
-
124
-
125
-
126
-
127
-
128
-
129
-
130
-
131
-
132
-
133
-
134
-
135
-
136
-
137
-
138
-
139
-
140
-
141
-
142
-
143
-
144
-
145
-
146
-
147
-
148
-
149
-
150
-
151
-
152
-
153
-
154
-
155
-
156
-
157
-
158
-
159
-
160
-
161
-
162
-
163
-
164
-
165
-
166
-
167
-
168
-
169
-
170
-
 171
171 -
 172
172 -
 173
173 -
 174
174 -
 175
175 -
 176
176 -
 177
177 -
 178
178 -
 179
179 -
 180
180 -
 181
181 -
182
-
183
-
184
-
185
-
186
-
187
-
188
-
189
-
190
-
191
-
192
-
193
-
194
-
195
-
196
-
197
-
198
-
199
-
200
-
201
-
202
-
203
-
204
-
205
-
206
-
207
-
208
-
209
-
210
-
211
-
212
-
213
-
214
-
215
-
216
-
217
-
218
-
219
-
220
-
221
-
222
-
223
-
224
-
225
-
226
-
227
-
228
-
229
-
230
-
231
-
232
-
233
-
234
-
235
-
236
-
237
-
238
-
239
-
240
-
241
-
242
-
243
-
244
-
245
-
246
 |
 |
