Lenovo ThinkPad T430s (English) User Guide - Page 105
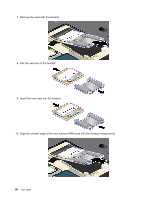
Remove the card., the card with the screw
 |
View all Lenovo ThinkPad T430s manuals
Add to My Manuals
Save this manual to your list of manuals |
Page 105 highlights
7. Remove the card. 8. Align the contact edge of the new wireless WAN card with the corresponding socket. 9. Pivot the card until you can snap it into place by pressing the upper side of each connector 1 . Secure the card with the screw 2 . Note: Depending on the system configuration of your computer, the card might have only one connector. Chapter 6. Replacing devices 87
-
 1
1 -
2
-
3
-
4
-
5
-
6
-
7
-
8
-
9
-
10
-
11
-
12
-
13
-
14
-
15
-
16
-
17
-
18
-
19
-
20
-
21
-
22
-
23
-
24
-
25
-
26
-
27
-
28
-
29
-
30
-
31
-
32
-
33
-
34
-
35
-
36
-
37
-
38
-
39
-
40
-
41
-
42
-
43
-
44
-
45
-
46
-
47
-
48
-
49
-
50
-
51
-
52
-
53
-
54
-
55
-
56
-
57
-
58
-
59
-
60
-
61
-
62
-
63
-
64
-
65
-
66
-
67
-
68
-
69
-
70
-
71
-
72
-
73
-
74
-
75
-
76
-
77
-
78
-
79
-
80
-
81
-
82
-
83
-
84
-
85
-
86
-
87
-
88
-
89
-
90
-
91
-
92
-
93
-
94
-
95
-
96
-
97
-
98
-
99
-
 100
100 -
 101
101 -
 102
102 -
 103
103 -
 104
104 -
 105
105 -
 106
106 -
 107
107 -
 108
108 -
 109
109 -
 110
110 -
111
-
112
-
113
-
114
-
115
-
116
-
117
-
118
-
119
-
120
-
121
-
122
-
123
-
124
-
125
-
126
-
127
-
128
-
129
-
130
-
131
-
132
-
133
-
134
-
135
-
136
-
137
-
138
-
139
-
140
-
141
-
142
-
143
-
144
-
145
-
146
-
147
-
148
-
149
-
150
-
151
-
152
-
153
-
154
-
155
-
156
-
157
-
158
-
159
-
160
-
161
-
162
-
163
-
164
-
165
-
166
-
167
-
168
-
169
-
170
-
171
-
172
-
173
-
174
-
175
-
176
-
177
-
178
-
179
-
180
-
181
-
182
-
183
-
184
-
185
-
186
-
187
-
188
-
189
-
190
-
191
-
192
 |
 |

7. Remove the card.
8. Align the contact edge of the new wireless WAN card with the corresponding socket.
9. Pivot the card until you can snap it into place by pressing the upper side of each connector
1
. Secure
the card with the screw
2
.
Note:
Depending on the system configuration of your computer, the card might have only one connector.
Chapter 6
.
Replacing devices
87