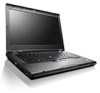
Lenovo ThinkPad T430s (English) User Guide - Page 59
Using an integrated camera, Using the optical drive
 |
View all Lenovo ThinkPad T430s manuals
Add to My Manuals
Save this manual to your list of manuals |
Page 59 highlights
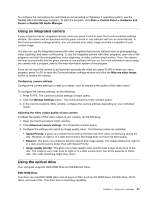
To configure the microphone for optimized sound recording on Windows 7 operating system, use the Realtek HD Audio Manager program. To start the program, click Start ➙ Control Panel ➙ Hardware and Sound ➙ Realtek HD Audio Manager. Using an integrated camera If your computer has an integrated camera, when you press Fn+F6 to open the Communications settings window, the camera will be launched and the green camera-in-use indicator will turn on automatically. In the Communications settings window, you can preview your video image and take a snapshot of your current image. You also can use the integrated camera with other programs that provide features such as photographing, video capturing, and video conferencing. To use the integrated camera with other programs, open one of the programs and start the photographing, video capturing, or video conferencing function. Then, the camera will start automatically and the green camera-in-use indicator will turn on. For more information about using the camera with a program, refer to the help information system of the program. If you do not want the camera to be launched automatically when you press Fn+F6 or when you use a program, press Fn+F6 to open the Communications settings window and click the Hide my video image button to disable the camera. Configuring camera settings Configure the camera settings to meet your needs, such as adjusting the quality of the video output. To configure the camera settings, do the following: 1. Press Fn+F6. The Communications settings window opens. 2. Click the Manage Settings button. The Communications Utility window opens. 3. In the Communications Utility window, configure the camera settings depending on your individual needs. Adjusting the video output quality of your camera To adjust the quality of the video output of your camera, do the following: 1. Open the Communications Utility window. 2. Click Advanced camera settings. The Properties window opens. 3. Configure the settings and select an image quality value. The following values are available: • Speed Priority: It gives you a faster frame rate for the best real-time video conferencing during the day. However, at night or in a dark environment, the image does not have the best quality. • Balance: This gives you a balance between speed and image quality. The image obtained at night or in a dark environment is better than with Speed Priority. • Image quality priority: This gives you a high-quality video and the best image at any time of the day. The image is very clear even at night or in a dark environment, but at the expense of frame rate. The video streaming might slow down. Using the optical drive Your computer supports DVD-ROM Drive and MultiBurner Drive. DVD-ROM Drive This drive can read DVD-ROM discs and all types of CDs, such as CD-ROM discs, CD-RW discs, CD-R discs, and audio CDs. This drive has no recording capability. Chapter 2. Using your computer 41
-
 1
1 -
2
-
3
-
4
-
5
-
6
-
7
-
8
-
9
-
10
-
11
-
12
-
13
-
14
-
15
-
16
-
17
-
18
-
19
-
20
-
21
-
22
-
23
-
24
-
25
-
26
-
27
-
28
-
29
-
30
-
31
-
32
-
33
-
34
-
35
-
36
-
37
-
38
-
39
-
40
-
41
-
42
-
43
-
44
-
45
-
46
-
47
-
48
-
49
-
50
-
51
-
52
-
53
-
 54
54 -
 55
55 -
 56
56 -
 57
57 -
 58
58 -
 59
59 -
 60
60 -
 61
61 -
 62
62 -
 63
63 -
 64
64 -
65
-
66
-
67
-
68
-
69
-
70
-
71
-
72
-
73
-
74
-
75
-
76
-
77
-
78
-
79
-
80
-
81
-
82
-
83
-
84
-
85
-
86
-
87
-
88
-
89
-
90
-
91
-
92
-
93
-
94
-
95
-
96
-
97
-
98
-
99
-
100
-
101
-
102
-
103
-
104
-
105
-
106
-
107
-
108
-
109
-
110
-
111
-
112
-
113
-
114
-
115
-
116
-
117
-
118
-
119
-
120
-
121
-
122
-
123
-
124
-
125
-
126
-
127
-
128
-
129
-
130
-
131
-
132
-
133
-
134
-
135
-
136
-
137
-
138
-
139
-
140
-
141
-
142
-
143
-
144
-
145
-
146
-
147
-
148
-
149
-
150
-
151
-
152
-
153
-
154
-
155
-
156
-
157
-
158
-
159
-
160
-
161
-
162
-
163
-
164
-
165
-
166
-
167
-
168
-
169
-
170
-
171
-
172
-
173
-
174
-
175
-
176
-
177
-
178
-
179
-
180
-
181
-
182
-
183
-
184
-
185
-
186
-
187
-
188
-
189
-
190
-
191
-
192
 |
 |
