Lenovo ThinkStation C20 Hardware Maintenance Manual - ThinkStation C20/C20x - Page 105
Replacing the power supply assembly, ThinkStation Safety and Warranty Guide, ThinkStation User Guide
 |
View all Lenovo ThinkStation C20 manuals
Add to My Manuals
Save this manual to your list of manuals |
Page 105 highlights
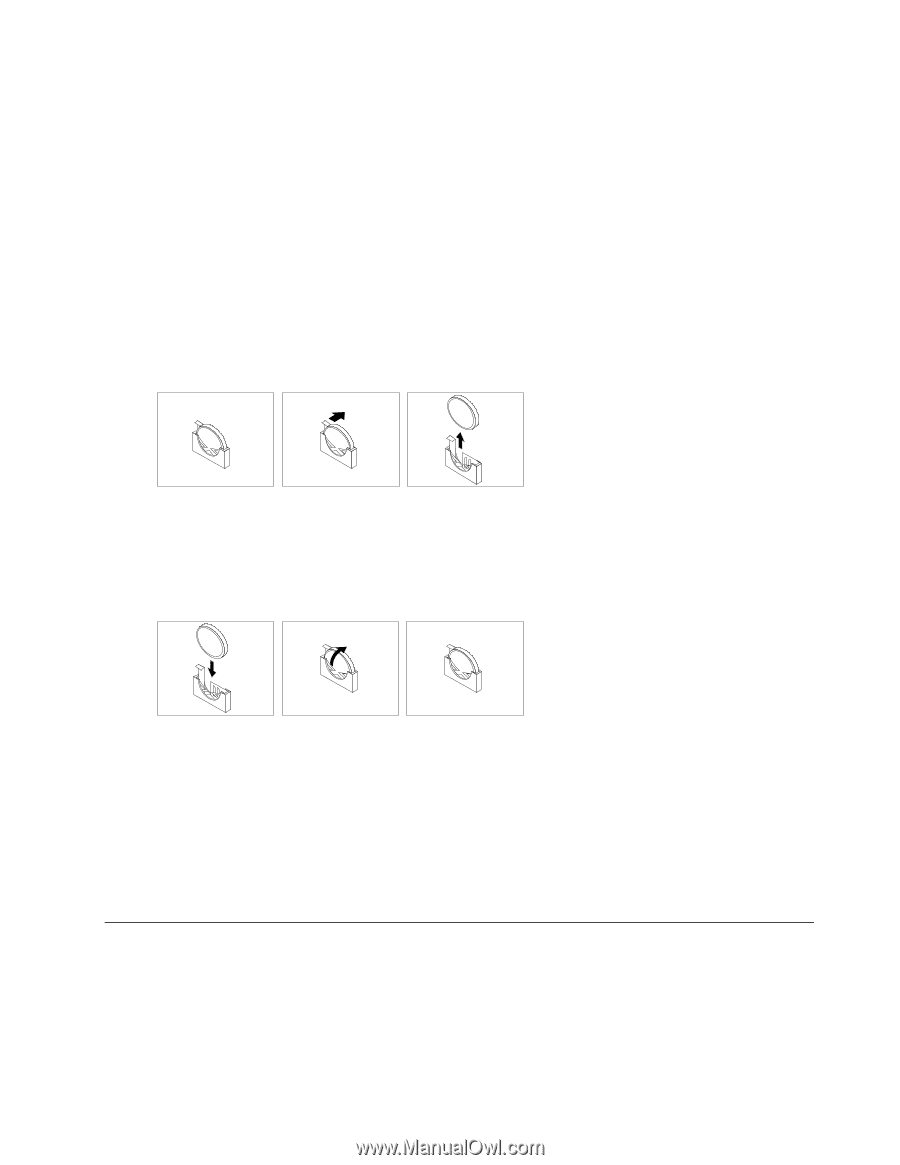
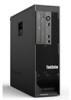
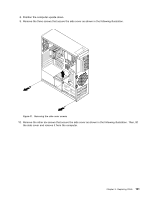
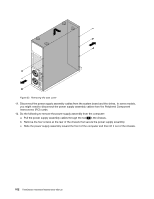
Refer to the "Lithium battery notice" in the ThinkStation Safety and Warranty Guide for information about replacing and disposing of the battery. To replace the battery, do the following: 1. Remove all media from the drives and turn off all attached devices and the computer. Then, disconnect all power cords from electrical outlets and disconnect all cables that are connected to the computer. 2. Remove the computer cover. See "Removing the computer cover" on page 74. 3. Remove the front bezel. See "Removing and reinstalling the front bezel" on page 75. 4. Remove the PCI card holder. See "Removing and reinstalling the PCI card holder" on page 76. 5. Locate the battery. See "Locating components" on page 70. 6. Remove the battery: a. Use one finger to push the battery horizontally out of its socket, pushing it away from the socket. b. Lift and remove the battery from the socket. 7. Follow any special handling and installation instructions that come with the replacement battery. 8. Insert the replacement battery: a. Hold the battery in a vertical orientation so that the smaller side is facing the socket. b. Place the battery into its socket, and press the battery towards the socket until it clicks into place. Make sure that the battery clip holds the battery securely. 9. Dispose of the battery as required by local ordinances or regulations. 10. Replace any PCI card that was removed. Reinstall the computer cover and connect the cables. See "Completing the parts replacement" on page 110. Note: When the computer is turned on for the first time after replacing the battery, an error message might be displayed. This is normal after replacing the battery. 11. Turn on the computer and all attached devices. 12. Use the Setup Utility program to set the date and time and any passwords. See "Using the Setup Utility" in the ThinkStation User Guide. Replacing the power supply assembly Attention Do not open your computer or attempt any repair before reading and understanding the "Important safety information" in the ThinkStation Safety and Warranty Guide that came with your computer. To obtain a copy of the ThinkStation Safety and Warranty Guide, go to: http://www.lenovo.com/support. Chapter 9. Replacing FRUs 99
-
 1
1 -
2
-
3
-
4
-
5
-
6
-
7
-
8
-
9
-
10
-
11
-
12
-
13
-
14
-
15
-
16
-
17
-
18
-
19
-
20
-
21
-
22
-
23
-
24
-
25
-
26
-
27
-
28
-
29
-
30
-
31
-
32
-
33
-
34
-
35
-
36
-
37
-
38
-
39
-
40
-
41
-
42
-
43
-
44
-
45
-
46
-
47
-
48
-
49
-
50
-
51
-
52
-
53
-
54
-
55
-
56
-
57
-
58
-
59
-
60
-
61
-
62
-
63
-
64
-
65
-
66
-
67
-
68
-
69
-
70
-
71
-
72
-
73
-
74
-
75
-
76
-
77
-
78
-
79
-
80
-
81
-
82
-
83
-
84
-
85
-
86
-
87
-
88
-
89
-
90
-
91
-
92
-
93
-
94
-
95
-
96
-
97
-
98
-
99
-
 100
100 -
 101
101 -
 102
102 -
 103
103 -
 104
104 -
 105
105 -
 106
106 -
 107
107 -
 108
108 -
 109
109 -
 110
110 -
111
-
112
-
113
-
114
-
115
-
116
-
117
-
118
-
119
-
120
-
121
-
122
-
123
-
124
-
125
-
126
-
127
-
128
-
129
-
130
-
131
-
132
-
133
-
134
-
135
-
136
-
137
-
138
-
139
-
140
-
141
-
142
-
143
-
144
-
145
-
146
-
147
-
148
-
149
-
150
-
151
-
152
-
153
-
154
-
155
-
156
-
157
-
158
-
159
-
160
-
161
-
162
-
163
-
164
-
165
-
166
-
167
-
168
-
169
-
170
-
171
-
172
-
173
-
174
-
175
-
176
-
177
-
178
-
179
-
180
-
181
-
182
-
183
-
184
-
185
-
186
-
187
-
188
-
189
-
190
-
191
-
192
-
193
-
194
-
195
-
196
-
197
-
198
-
199
-
200
-
201
-
202
-
203
-
204
-
205
-
206
-
207
-
208
-
209
-
210
-
211
-
212
-
213
-
214
-
215
-
216
-
217
-
218
-
219
-
220
-
221
-
222
-
223
-
224
-
225
-
226
-
227
-
228
-
229
-
230
-
231
-
232
-
233
-
234
-
235
-
236
-
237
-
238
-
239
-
240
-
241
-
242
-
243
-
244
-
245
-
246
 |
 |