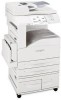
Lexmark X852E User's Reference - Page 27
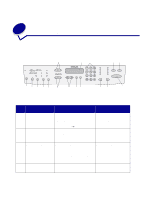
Function modes, PROFILE, EMAIL
 |
UPC - 734646002806
View all Lexmark X852E manuals
Add to My Manuals
Save this manual to your list of manuals |
Page 27 highlights
Function modes Control panel mode When it appears on the control panel Message displayed Copy Default mode (you do not need to press Fax/Scan Mode) In copy mode, you can make a copy by placing the document in the scanner and pressing Go/Send on the MFP control panel. Ready Fax (manually enter the outgoing fax phone number) If you have set the basic fax information during setup, press Fax/Scan Mode once to move the control panel into this mode. In fax mode, enter the fax phone number of the recipient using the numeric keypad on the MFP control panel, and then press Go/Send to send the fax. Enter Phone # Scan to Fax (permanent destinations) If you have set the basic fax information during setup, and you have created fax destinations, press Fax/Scan Mode repeatedly until you see SCAN → Fax in the MFP control panel display. Note: To send faxes to multiple destinations, you must create a permanent destination containing the group of numbers you want to fax. See "Sending faxes" on page 8 for more information. SCAN → Fax Scan to Profile (back to PC or to an e-mail) For your scan profiles to appear on the MFP control panel, you must define both your Scan to PC and Scan to e-mail job profiles using the MarkNet resident Web pages. In Scan to Profile mode to see your profiles, you must press Fax/Scan Mode repeatedly until you see SCAN → PROFILE, and then Menu > to advance through your profile names. SCAN → PROFILE Scan to e-mail (permanent destinations) For a list of permanent e-mail destinations to appear on the MFP control panel, you must set up each e-mail recipient using the MarkNet resident Web pages. In Scan to e-mail mode to see your e-mail destination list, you must press Fax/Scan Mode repeatedly until you see SCAN → EMAIL, and then Menu > to advance through your permanent destinations. Note: To send to multiple e-mail destinations, press Select to add an asterisk to your choices. Press Go/ Send when you have finished. SCAN → EMAIL Scan to FTP (FTP servers) For a list of Scan to FTP destinations to appear on the control panel, you must set up the FTP destinations using the MarkNet resident Web pages. In Scan to FTP mode to see a list of your configured FTP servers, you must press Fax/Scan Mode repeatedly until you see SCAN → FTP, and then Menu > to advance through your FTP destinations. Note: You can create multiple FTP servers, but you can only scan to one server at a time. SCAN ® FTP Function modes 22
-
 1
1 -
2
-
3
-
4
-
5
-
6
-
7
-
8
-
9
-
10
-
11
-
12
-
13
-
14
-
15
-
16
-
17
-
18
-
19
-
20
-
21
-
 22
22 -
 23
23 -
 24
24 -
 25
25 -
 26
26 -
 27
27 -
 28
28 -
 29
29 -
 30
30 -
 31
31 -
 32
32 -
33
-
34
-
35
-
36
-
37
-
38
-
39
-
40
-
41
-
42
-
43
-
44
-
45
-
46
-
47
-
48
-
49
-
50
-
51
-
52
-
53
-
54
-
55
-
56
-
57
-
58
-
59
-
60
-
61
 |
 |