Lexmark XC4143 Users Guide PDF - Page 18
Setting up and using the home screen applications, Customizing the home screen, Supported applications
 |
View all Lexmark XC4143 manuals
Add to My Manuals
Save this manual to your list of manuals |
Page 18 highlights
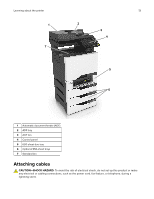
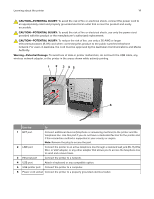
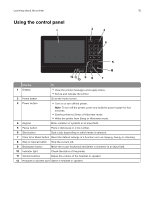
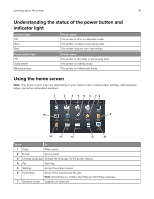
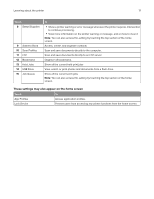
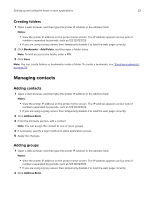
Setting up and using the home screen applications 18 Setting up and using the home screen applications Customizing the home screen 1 From the control panel, touch Settings > Device > Visible Home Screen Icons. 2 Select the icons that you want to appear on the home screen. 3 Apply the changes. Supported applications Application Scan Center Shortcut Center Card Copy Display Customization Cloud Connector Customer Support Device Quotas QR Code Eco‑Settings Printer models CX725, CX727, XC4140, XC4143, XC4150, XC4153 CX725, CX727, XC4140, XC4143, XC4150, XC4153 CX725, CX727, XC4140, XC4143, XC4150, XC4153 CX725, CX727, XC4140, XC4143, XC4150, XC4153 CX727, XC4140, XC4143, XC4150, XC4153 XC4140, XC4143, XC4150, XC4153 XC4140, XC4143, XC4150, XC4153 XC4140, XC4143, XC4150, XC4153 XC4140, XC4143, XC4150, XC4153 Setting up Forms and Favorites 1 Open a Web browser, and then type the printer IP address in the address field. Notes: • View the printer IP address on the printer home screen. The IP address appears as four sets of numbers separated by periods, such as 123.123.123.123. • If you are using a proxy server, then temporarily disable it to load the Web page correctly. 2 Click Apps > Forms and Favorites > Configure. 3 Click Add, and then customize the settings. Notes: • To make sure that the location settings of the bookmark are correct, type the IP address of the host computer where the bookmark is located. • Make sure that the printer has access rights to the folder where the bookmark is located. 4 Apply the changes.
-
 1
1 -
2
-
3
-
4
-
5
-
6
-
7
-
8
-
9
-
10
-
11
-
12
-
 13
13 -
 14
14 -
 15
15 -
 16
16 -
 17
17 -
 18
18 -
 19
19 -
 20
20 -
 21
21 -
 22
22 -
 23
23 -
24
-
25
-
26
-
27
-
28
-
29
-
30
-
31
-
32
-
33
-
34
-
35
-
36
-
37
-
38
-
39
-
40
-
41
-
42
-
43
-
44
-
45
-
46
-
47
-
48
-
49
-
50
-
51
-
52
-
53
-
54
-
55
-
56
-
57
-
58
-
59
-
60
-
61
-
62
-
63
-
64
-
65
-
66
-
67
-
68
-
69
-
70
-
71
-
72
-
73
-
74
-
75
-
76
-
77
-
78
-
79
-
80
-
81
-
82
-
83
-
84
-
85
-
86
-
87
-
88
-
89
-
90
-
91
-
92
-
93
-
94
-
95
-
96
-
97
-
98
-
99
-
100
-
101
-
102
-
103
-
104
-
105
-
106
-
107
-
108
-
109
-
110
-
111
-
112
-
113
-
114
-
115
-
116
-
117
-
118
-
119
-
120
-
121
-
122
-
123
-
124
-
125
-
126
-
127
-
128
-
129
-
130
-
131
-
132
-
133
-
134
-
135
-
136
-
137
-
138
-
139
-
140
-
141
-
142
-
143
-
144
-
145
-
146
-
147
-
148
-
149
-
150
-
151
-
152
-
153
-
154
-
155
-
156
-
157
-
158
-
159
-
160
-
161
-
162
-
163
-
164
-
165
-
166
-
167
-
168
-
169
-
170
-
171
-
172
-
173
-
174
-
175
-
176
-
177
-
178
-
179
-
180
-
181
-
182
-
183
-
184
-
185
-
186
-
187
-
188
-
189
-
190
-
191
-
192
-
193
-
194
-
195
-
196
-
197
-
198
-
199
-
200
-
201
-
202
-
203
-
204
-
205
-
206
-
207
-
208
-
209
-
210
-
211
-
212
-
213
-
214
-
215
-
216
-
217
-
218
-
219
-
220
-
221
-
222
-
223
-
224
-
225
-
226
-
227
-
228
-
229
-
230
-
231
-
232
-
233
-
234
-
235
-
236
-
237
-
238
-
239
-
240
-
241
-
242
-
243
-
244
-
245
-
246
-
247
-
248
-
249
-
250
-
251
-
252
-
253
-
254
-
255
-
256
-
257
-
258
-
259
-
260
-
261
-
262
-
263
-
264
-
265
-
266
-
267
-
268
-
269
-
270
-
271
-
272
-
273
 |
 |