Linksys WPS54G User Guide - Page 48
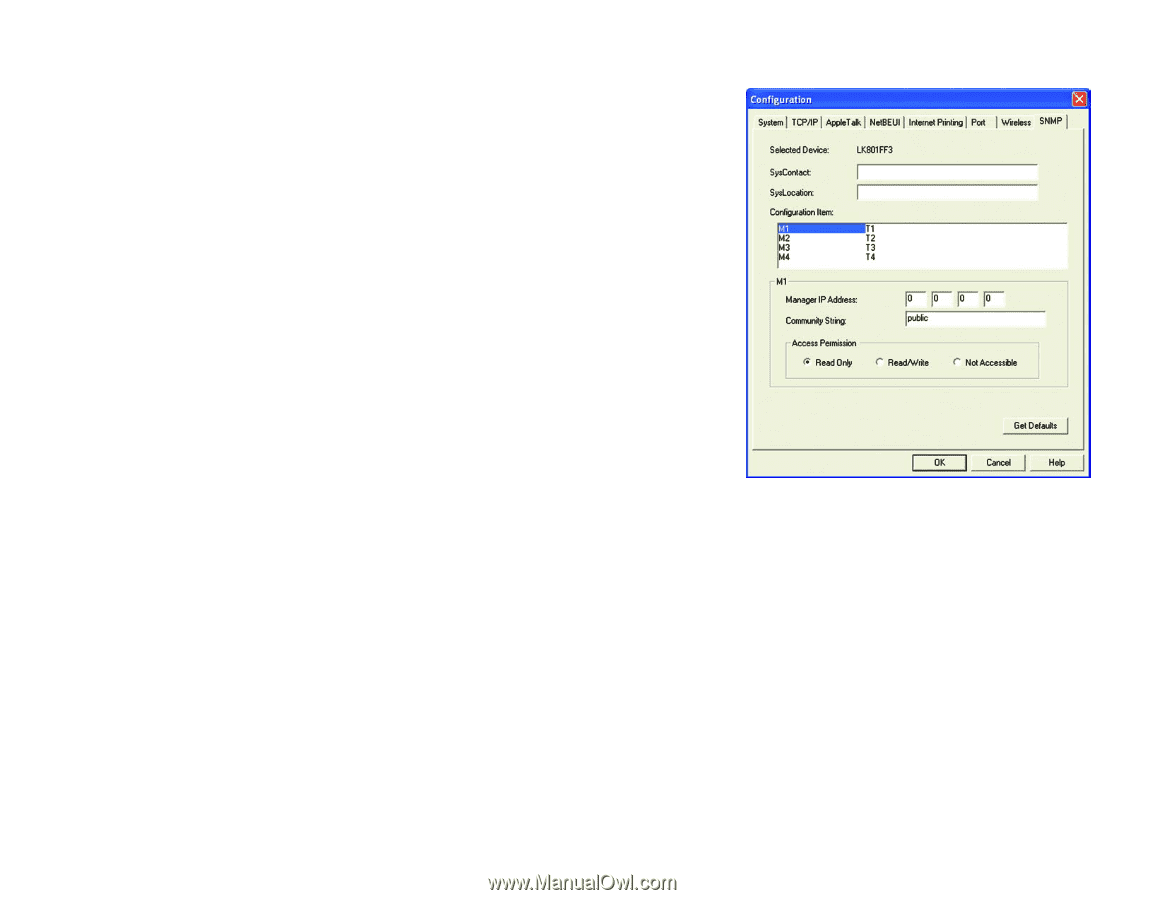
SysContact, SysLocation, Configuration Item, Manager IP Address, Community String, Access Permission - default ip address
 |
UPC - 745883561049
View all Linksys WPS54G manuals
Add to My Manuals
Save this manual to your list of manuals |
Page 48 highlights
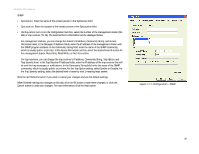
Wireless-G PrintServer SNMP • SysContact. Enter the name of the contact person in the SysContact field. • SysLocation. Enter the location of the contact person in the SysLocation field. • Configuration Item. From the Configuration Item box, select the number of the management station (M1M4) or trap receiver (T1-T4). The selected item's information will be displayed below. For management stations, you can change the station's IP address, Community String, and Access Permission level. In the Manager IP Address fields, enter the IP address of the management station with the SNMP program installed. In the Community String field, enter the name of the SNMP community, which is usually public or private. In the Access Permission section, select the desired level of access for this management station, Read Only, Read/Write, or Not Accessible. For trap receivers, you can change the trap receiver's IP address, Community String, Trap Option, and Trap Severity level. In the Trap Receive IP Address fields, enter the IP address of the trap receiver that will be sent the trap messages or notifications. In the Community String field, enter the name of the SNMP community, which is usually public or private. For the Trap Option setting, select Enable or Disable. For the Trap Severity setting, select the desired level of severity, with 1 meaning least severe. Click the Get Defaults button if you want to cancel your changes and use the default settings. When finished making your changes on this tab, click the OK button to save these changes, or click the Cancel button to undo your changes. For more information, click the Help button. Figure 7-17: Configuration - SNMP Chapter 7: Bi-Admin Management 42 The Bi-Admin Management Utility
-
 1
1 -
2
-
3
-
4
-
5
-
6
-
7
-
8
-
9
-
10
-
11
-
12
-
13
-
14
-
15
-
16
-
17
-
18
-
19
-
20
-
21
-
22
-
23
-
24
-
25
-
26
-
27
-
28
-
29
-
30
-
31
-
32
-
33
-
34
-
35
-
36
-
37
-
38
-
39
-
40
-
41
-
42
-
 43
43 -
 44
44 -
 45
45 -
 46
46 -
 47
47 -
 48
48 -
 49
49 -
 50
50 -
 51
51 -
 52
52 -
 53
53 -
54
-
55
-
56
-
57
-
58
-
59
-
60
-
61
-
62
-
63
-
64
-
65
-
66
-
67
-
68
-
69
-
70
-
71
-
72
-
73
-
74
 |
 |