McAfee GSSCDE-AA-DA User Guide - Page 28
McAfee GroupShield for Exchange - Select Installation type
 |
View all McAfee GSSCDE-AA-DA manuals
Add to My Manuals
Save this manual to your list of manuals |
Page 28 highlights
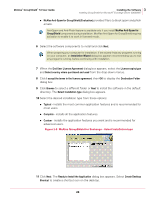
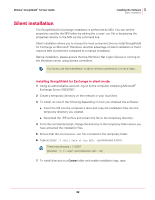
McAfee® GroupShield™ 7.0 User Guide 3 Installing the Software Installing GroupShield for Microsoft® Exchange Server 2003/2007 „ McAfee Anti-Spam for GroupShield (Evaluation) provides filters to block spam and phish emails. Anti-Spam and Anti-Phish feature is available only if you install McAfee Anti-Spam for GroupShield component during installation. McAfee Anti-Spam for GroupShield requires Note activation to enable it to work in licensed mode. 6 Select the software components to install and click Next. When preparing your computer for installation, if the wizard finds any programs running on your computer, an Installation Wizard dialog box appears recommending you to exit Note any programs running, before continuing with installation. 7 When the End User License Agreement dialog box appears, select the License expiry type and Select country where purchased and used from the drop-down menus. 8 Click I accept the terms in the license agreement, then OK to display the Destination Folder dialog box. 9 Click Browse to select a different folder or Next to install the software in the default directory. The Select Installation type dialog box appears. 10 Select the desired installation type from these options: „ Typical - installs the most common application features and is recommended for most users. „ Complete - installs all the application features. „ Custom - installs the application features you want and is recommended for advanced users. Figure 3-3 McAfee GroupShield for Exchange - Select Installation type 11 Click Next. The Ready to Install the Application dialog box appears. Select Create Desktop Shortcut to create a shortcut icon on the desktop. 28
-
 1
1 -
2
-
3
-
4
-
5
-
6
-
7
-
8
-
9
-
10
-
11
-
12
-
13
-
14
-
15
-
16
-
17
-
18
-
19
-
20
-
21
-
22
-
 23
23 -
 24
24 -
 25
25 -
 26
26 -
 27
27 -
 28
28 -
 29
29 -
 30
30 -
 31
31 -
 32
32 -
 33
33 -
34
-
35
-
36
-
37
-
38
-
39
-
40
-
41
-
42
-
43
-
44
-
45
-
46
-
47
-
48
-
49
-
50
-
51
-
52
-
53
-
54
-
55
-
56
-
57
-
58
-
59
-
60
-
61
-
62
-
63
-
64
-
65
-
66
-
67
-
68
-
69
-
70
-
71
-
72
-
73
-
74
-
75
-
76
-
77
-
78
-
79
-
80
-
81
-
82
-
83
-
84
-
85
-
86
-
87
-
88
-
89
-
90
-
91
-
92
-
93
-
94
-
95
-
96
-
97
-
98
-
99
-
100
-
101
-
102
-
103
-
104
-
105
-
106
-
107
-
108
-
109
-
110
-
111
-
112
-
113
-
114
-
115
-
116
-
117
-
118
-
119
-
120
-
121
-
122
-
123
-
124
-
125
-
126
-
127
-
128
-
129
-
130
-
131
-
132
-
133
-
134
-
135
-
136
-
137
-
138
-
139
-
140
-
141
-
142
-
143
-
144
-
145
-
146
-
147
-
148
-
149
-
150
-
151
-
152
-
153
-
154
-
155
-
156
-
157
-
158
-
159
-
160
-
161
-
162
-
163
-
164
-
165
-
166
-
167
-
168
-
169
-
170
-
171
-
172
-
173
-
174
-
175
-
176
-
177
-
178
-
179
-
180
 |
 |
