Netgear MR314 Reference Guide - Page 28
Connecting to Your Internet Access Device, Connecting the Power Adapter
 |
UPC - 606449022148
View all Netgear MR314 manuals
Add to My Manuals
Save this manual to your list of manuals |
Page 28 highlights
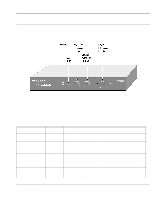
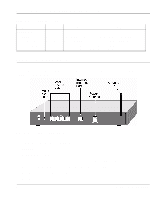
Reference Guide for the Model MR314 Cable/DSL Wireless Router • Connect any LOCAL port of your Model MR314 router to any port of an Ethernet hub or switch using a standard or crossover Ethernet cable. Because the Model MR314 router is capable of automatically sensing the polarity of the Ethernet connection, you can connect to the other hub's normal or uplink port, using a standard or crossover Ethernet cable. The LOCAL port of your Model MR314 router will automatically configure itself for proper operation. Connecting to Your Internet Access Device To connect the router to the Internet (or WAN): 1. Using the Ethernet cable provided with your cable modem or DSL modem, connect the router's INTERNET port to the 10BASE-T Ethernet port on your modem. Note: The attached modem device must provide a standard 10BASE-T Ethernet connection. The Model MR314 router does not include a cable for this connection. Instead, use the Ethernet cable provided with your access device or any other standard 10BASE-T Ethernet cable. If you are using a DSL modem, the modem's connection to the phone line remains unchanged. Note: The Ethernet cable supplied by your ISP for connecting to your cable or DSL modem may be an Ethernet crossover cable rather than a straight-through cable. It is important to use this cable to connect the modem to your router, not to connect your PCs to your router. Connecting the Power Adapter To connect the router to the power adapter: 1. Plug the connector of the power adapter into the 12 VDC adapter outlet on the rear panel of the router. 2. Plug the other end of the adapter into a standard wall outlet. 3. Verify that the PWR LED on the router is lit. Verifying Power and Connections After applying power to the router, complete the following steps to verify that power is correctly applied: 1. When power is first applied, verify that the PWR LED is on. 2. Verify that the TEST LED begins to blink within a few seconds. 2-6 Setting Up the Hardware
-
 1
1 -
2
-
3
-
4
-
5
-
6
-
7
-
8
-
9
-
10
-
11
-
12
-
13
-
14
-
15
-
16
-
17
-
18
-
19
-
20
-
21
-
22
-
 23
23 -
 24
24 -
 25
25 -
 26
26 -
 27
27 -
 28
28 -
 29
29 -
 30
30 -
 31
31 -
 32
32 -
 33
33 -
34
-
35
-
36
-
37
-
38
-
39
-
40
-
41
-
42
-
43
-
44
-
45
-
46
-
47
-
48
-
49
-
50
-
51
-
52
-
53
-
54
-
55
-
56
-
57
-
58
-
59
-
60
-
61
-
62
-
63
-
64
-
65
-
66
-
67
-
68
-
69
-
70
-
71
-
72
-
73
-
74
-
75
-
76
-
77
-
78
-
79
-
80
-
81
-
82
-
83
-
84
-
85
-
86
-
87
-
88
-
89
-
90
-
91
-
92
-
93
-
94
-
95
-
96
-
97
-
98
-
99
-
100
-
101
-
102
-
103
-
104
-
105
-
106
-
107
-
108
-
109
-
110
-
111
-
112
-
113
-
114
 |
 |