Netgear WAC720 Reference Manual - Page 18
Con the IPv4 Settings, Configuration > IP > IP Settings
 |
View all Netgear WAC720 manuals
Add to My Manuals
Save this manual to your list of manuals |
Page 18 highlights
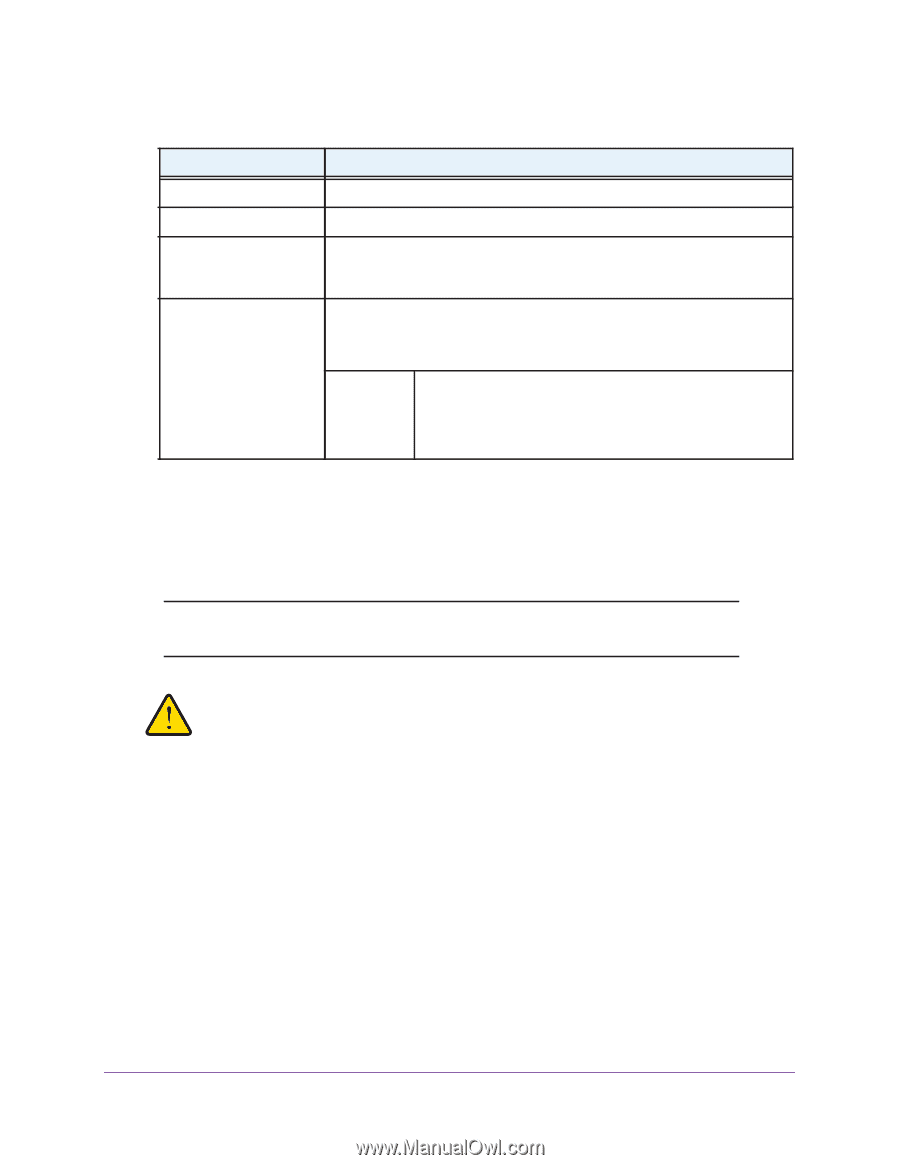
ProSAFE Dual-Band Wireless AC Access Point WAC720 WAC730 2. Configure the settings as explained in the following table: Setting Description Time Zone Select the time zone to match your location. Current Time This is a nonconfigurable field that displays the current date and time. NTP Client Enable the Network Time Protocol (NTP) client to synchronize the time of the wireless access point with an NTP server. By default the Enable radio button is selected. Use Custom NTP Server Select this check box if you want to use a custom NTP server. Note: You need an Internet connection to use an NTP server that is not on your local network. Hostname / IP Address Enter the host name or IP address of the custom NTP server. The default is time-b.netgear.com. Note: If you use a host name, make sure that you have configured a DNS server. 3. Click Apply button. Your settings are saved. Configure the IPv4 Settings Note: For information about how to configure the IPv6 settings, see Configure the IPv6 Settings on page 72. WARNING: If you enable the DHCP client, the IP address of the wireless access point changes when you click the Apply button, causing you to lose your connection to the wireless access point. You must use the new IP address to reconnect to the wireless access point. Tip: If you enable the DHCP client on the wireless access point, you can discover the new IP address of the wireless access point by accessing the DHCP server on your LAN, or by using a network IP address scanner application. To configure the IPv4 settings: 1. Select Configuration > IP > IP Settings. Initial Setup 18
-
 1
1 -
2
-
3
-
4
-
5
-
6
-
7
-
8
-
9
-
10
-
11
-
12
-
 13
13 -
 14
14 -
 15
15 -
 16
16 -
 17
17 -
 18
18 -
 19
19 -
 20
20 -
 21
21 -
 22
22 -
 23
23 -
24
-
25
-
26
-
27
-
28
-
29
-
30
-
31
-
32
-
33
-
34
-
35
-
36
-
37
-
38
-
39
-
40
-
41
-
42
-
43
-
44
-
45
-
46
-
47
-
48
-
49
-
50
-
51
-
52
-
53
-
54
-
55
-
56
-
57
-
58
-
59
-
60
-
61
-
62
-
63
-
64
-
65
-
66
-
67
-
68
-
69
-
70
-
71
-
72
-
73
-
74
-
75
-
76
-
77
-
78
-
79
-
80
-
81
-
82
-
83
-
84
-
85
-
86
-
87
-
88
-
89
-
90
-
91
-
92
-
93
-
94
-
95
-
96
-
97
-
98
-
99
-
100
-
101
-
102
-
103
-
104
-
105
-
106
-
107
-
108
-
109
-
110
-
111
-
112
-
113
 |
 |