Netgear WNA1000 WNA1000 User Manual - Page 27
Using Push 'N' Connect (WPS) to Connect to a Wireless Network, Finish, Close - review
 |
View all Netgear WNA1000 manuals
Add to My Manuals
Save this manual to your list of manuals |
Page 27 highlights
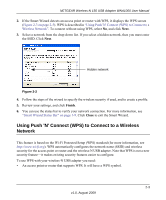
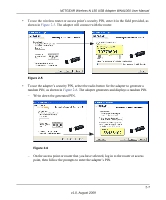
NETGEAR Wireless-N 150 USB Adapter WNA1000 User Manual 2. If the Smart Wizard detects an access point or router with WPS, it displays the WPS screen (Figure 2-3 on page 2-5). WPS is described in "Using Push 'N' Connect (WPS) to Connect to a Wireless Network". To connect without using WPS, select No, and click Next. 3. Select a network from the drop-down list. If you select a hidden network, then you must enter the SSID. Click Next. Hidden network Figure 2-2 4. Follow the steps of the wizard to specify the wireless security if used, and to create a profile. 5. Review your settings, and click Finish. 6. You can use the status bar to verify your network connection. For more information, see "Smart Wizard Status Bar" on page 1-9. Click Close to exit the Smart Wizard. Using Push 'N' Connect (WPS) to Connect to a Wireless Network This feature is based on the Wi-Fi Protected Setup (WPS) standard (for more information, see http://www.wi-fi.org). WPS automatically configures the network name (SSID) and wireless security for the access point or router and the wireless-N USB adapter. Note that WPS is not a new security feature-it makes existing security features easier to configure. To use WPS with your wireless-N USB adapter you need: • An access point or router that supports WPS. It will have a WPS symbol. 2-3 v1.0, August 2009
-
 1
1 -
2
-
3
-
4
-
5
-
6
-
7
-
8
-
9
-
10
-
11
-
12
-
13
-
14
-
15
-
16
-
17
-
18
-
19
-
20
-
21
-
 22
22 -
 23
23 -
 24
24 -
 25
25 -
 26
26 -
 27
27 -
 28
28 -
 29
29 -
 30
30 -
 31
31 -
 32
32 -
33
-
34
-
35
-
36
-
37
-
38
-
39
-
40
-
41
-
42
-
43
-
44
-
45
-
46
-
47
-
48
-
49
-
50
-
51
-
52
-
53
-
54
-
55
-
56
-
57
-
58
 |
 |
