Netgear WNA1000 WNA1000 User Manual - Page 39
Setting Up WPA-PSK [TKIP] or WPA2-PSK [AES] Security, Profile, Network Name SSID, WPA-PSK [TKIP] - install software
 |
View all Netgear WNA1000 manuals
Add to My Manuals
Save this manual to your list of manuals |
Page 39 highlights
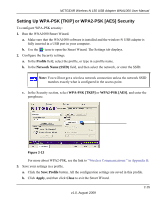
NETGEAR Wireless-N 150 USB Adapter WNA1000 User Manual Setting Up WPA-PSK [TKIP] or WPA2-PSK [AES] Security To configure WPA-PSK security: 1. Run the WNA1000 Smart Wizard. a. Make sure that the WNA1000 software is installed and the wireless-N USB adapter is fully inserted in a USB port in your computer. b. Use the icon to open the Smart Wizard. The Settings tab displays. 2. Configure the Security settings. a. In the Profile field, select the profile, or type in a profile name. b. In the Network Name (SSID) field, and then select the network, or enter the SSID. Note: You will not get a wireless network connection unless the network SSID matches exactly what is configured in the access point. c. In the Security section, select WPA-PSK [TKIP] or WPA2-PSK [AES], and enter the passphrase. Figure 2-12 For more about WPA2-PSK, see the link to "Wireless Communications:" in Appendix B. 3. Save your settings in a profile. a. Click the Save Profile button. All the configuration settings are saved in this profile. b. Click Apply, and then click Close to exit the Smart Wizard. v1.0, August 2009 2-15
-
 1
1 -
2
-
3
-
4
-
5
-
6
-
7
-
8
-
9
-
10
-
11
-
12
-
13
-
14
-
15
-
16
-
17
-
18
-
19
-
20
-
21
-
22
-
23
-
24
-
25
-
26
-
27
-
28
-
29
-
30
-
31
-
32
-
33
-
 34
34 -
 35
35 -
 36
36 -
 37
37 -
 38
38 -
 39
39 -
 40
40 -
 41
41 -
 42
42 -
 43
43 -
 44
44 -
45
-
46
-
47
-
48
-
49
-
50
-
51
-
52
-
53
-
54
-
55
-
56
-
57
-
58
 |
 |
