Netgear XSM4324FS Software Setup Manual Software Version 12.x - Page 19
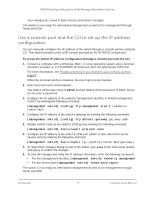
Use a console port and the CLI to set up the IP address configuration
 |
View all Netgear XSM4324FS manuals
Add to My Manuals
Save this manual to your list of manuals |
Page 19 highlights
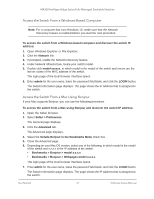
M4300 Intelligent Edge Series Fully Managed Stackable Switches Your changes are saved in flash memory (permanent storage). The switch is now ready for web-based management as well as for management through Telnet and SSH. Use a console port and the CLI to set up the IP address configuration You can manually configure the IP address of the switch through a console port by using the CLI. The switch provides a mini USB console port and an RJ-45 RS232 console port. To set up the switch IP address configuration through a console port and the CLI: 1. Connect a computer with a Windows, MAC, or Linux operating system and a terminal emulation program or a VT100/ANSI terminal and open the appropriate COM port. For more information, see Prepare a terminal if you intend to use a console port on page 8. When the terminal interface initializes, the user login prompt displays. 2. Enter your user name and password. The default admin user name is admin and the default admin password is blank, that is, do not enter a password. 3. Configure the IP address of the switch's management interface in default management VLAN 1 by entering the following command: (management switch) (config) #ip management vlan 1 ipaddress subnetmask 4. Configure the IP address of the switch's gateway by entering the following command: (management switch) (config) #ip default-gateway gateway-addr 5. Disable DHCP mode on the switch's OOB port by entering the following command: (management switch) #serviceport protocol none 6. Configure the IP address of the switch's OOB port (which is also referred to as the service port) by entering the following command: (management switch) #serviceport ip ipaddress subnetmask [gateway] 7. To retain these changes during a reset of the switch, type save at the main menu prompt, and type y to confirm the changes. 8. To view the changes and verify the IP address information, enter the following commands: • For the management interface: (management switch) #show ip management • For the service port: (management switch) #show serviceport The switch is now ready for web-based management as well as for management through Telnet and SSH. Get Started 19 Software Setup Manual
-
 1
1 -
2
-
3
-
4
-
5
-
6
-
7
-
8
-
9
-
10
-
11
-
12
-
13
-
 14
14 -
 15
15 -
 16
16 -
 17
17 -
 18
18 -
 19
19 -
 20
20 -
 21
21 -
 22
22 -
 23
23 -
 24
24 -
25
-
26
-
27
-
28
-
29
-
30
-
31
-
32
-
33
 |
 |