Nikon COOLPIX P610 Reference Manual - Page 46
Changing the Shooting Mode
 |
View all Nikon COOLPIX P610 manuals
Add to My Manuals
Save this manual to your list of manuals |
Page 46 highlights
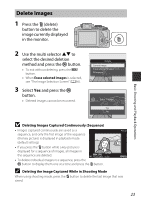
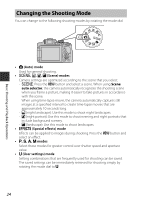
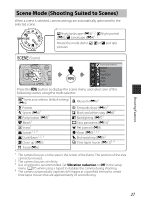
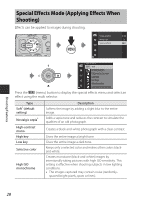
Basic Shooting and Playback Operations Changing the Shooting Mode You can change to the following shooting modes by rotating the mode dial. • A (Auto) mode Used for general shooting. • y, X, s, c (Scene) modes Camera settings are optimized according to the scene that you select. - y: Press the d button and select a scene. When using Scene auto selector, the camera automatically recognizes the shooting scene when you frame a picture, making it easier to take pictures in accordance with the scene. When using time-lapse movie, the camera automatically captures still images at a specified interval to create time-lapse movies that are approximately 10 seconds long. - X (night landscape): Use this mode to shoot night landscapes. - s (night portrait): Use this mode to shoot evening and night portraits that include background scenery. - c (landscape): Use this mode to shoot landscapes. • u (Special effects) mode Effects can be applied to images during shooting. Press the d button and select an effect. • j, k, l, m modes Select these modes for greater control over shutter speed and aperture value. • M (User settings) mode Setting combinations that are frequently used for shooting can be saved. The saved settings can be immediately retrieved for shooting simply by rotating the mode dial to M. 24
-
 1
1 -
2
-
3
-
4
-
5
-
6
-
7
-
8
-
9
-
10
-
11
-
12
-
13
-
14
-
15
-
16
-
17
-
18
-
19
-
20
-
21
-
22
-
23
-
24
-
25
-
26
-
27
-
28
-
29
-
30
-
31
-
32
-
33
-
34
-
35
-
36
-
37
-
38
-
39
-
40
-
 41
41 -
 42
42 -
 43
43 -
 44
44 -
 45
45 -
 46
46 -
 47
47 -
 48
48 -
 49
49 -
 50
50 -
 51
51 -
52
-
53
-
54
-
55
-
56
-
57
-
58
-
59
-
60
-
61
-
62
-
63
-
64
-
65
-
66
-
67
-
68
-
69
-
70
-
71
-
72
-
73
-
74
-
75
-
76
-
77
-
78
-
79
-
80
-
81
-
82
-
83
-
84
-
85
-
86
-
87
-
88
-
89
-
90
-
91
-
92
-
93
-
94
-
95
-
96
-
97
-
98
-
99
-
100
-
101
-
102
-
103
-
104
-
105
-
106
-
107
-
108
-
109
-
110
-
111
-
112
-
113
-
114
-
115
-
116
-
117
-
118
-
119
-
120
-
121
-
122
-
123
-
124
-
125
-
126
-
127
-
128
-
129
-
130
-
131
-
132
-
133
-
134
-
135
-
136
-
137
-
138
-
139
-
140
-
141
-
142
-
143
-
144
-
145
-
146
-
147
-
148
-
149
-
150
-
151
-
152
-
153
-
154
-
155
-
156
-
157
-
158
-
159
-
160
-
161
-
162
-
163
-
164
-
165
-
166
-
167
-
168
-
169
-
170
-
171
-
172
-
173
-
174
-
175
-
176
-
177
-
178
-
179
-
180
-
181
-
182
-
183
-
184
-
185
-
186
-
187
-
188
-
189
-
190
-
191
-
192
-
193
-
194
-
195
-
196
-
197
-
198
-
199
-
200
-
201
-
202
-
203
-
204
-
205
-
206
-
207
-
208
-
209
-
210
-
211
-
212
-
213
-
214
-
215
-
216
-
217
-
218
-
219
-
220
-
221
-
222
-
223
-
224
-
225
-
226
-
227
-
228
-
229
-
230
-
231
-
232
-
233
-
234
-
235
-
236
-
237
-
238
 |
 |
