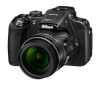
Nikon COOLPIX P610 Reference Manual - Page 78
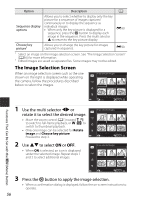
The Image Selection Screen, Use the multi selector, rotate it to select the desired image., to select
 |
View all Nikon COOLPIX P610 manuals
Add to My Manuals
Save this manual to your list of manuals |
Page 78 highlights
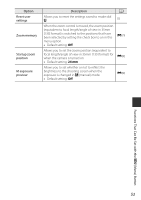
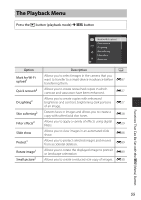
Option Description A Sequence display options Allows you to select whether to display only the key picture for a sequence of images captured continuously or to display the sequence as individual images. • When only the key picture is displayed for a sequence, press the k button to display each image in the sequence. Press the multi selector H to return to the key picture display. E90 Choose key picture1 Allows you to change the key picture for images captured in sequence. E90 1 Select an image on the image selection screen. See "The Image Selection Screen" (A56) for more information. 2 Edited images are saved as separate files. Some images may not be edited. The Image Selection Screen When an image selection screen such as the one shown on the right is displayed while operating the camera, follow the procedures described below to select the images. Erase selected images Functions That Can Be Set with the d (Menu) Button 1 Use the multi selector JK or rotate it to select the desired image. • Move the zoom control (A1) toward g (i) to switch to full-frame playback, or f (h) to switch to thumbnail playback. • Only one image can be selected for Rotate image and Choose key picture. Proceed to step 3. 2 Use HI to select ON or OFF. • When ON is selected, an icon is displayed under the selected image. Repeat steps 1 and 2 to select additional images. Back Erase selected images Back Erase selected images Back 3 Press the k button to apply the image selection. • When a confirmation dialog is displayed, follow the on-screen instructions to operate. 56
-
 1
1 -
2
-
3
-
4
-
5
-
6
-
7
-
8
-
9
-
10
-
11
-
12
-
13
-
14
-
15
-
16
-
17
-
18
-
19
-
20
-
21
-
22
-
23
-
24
-
25
-
26
-
27
-
28
-
29
-
30
-
31
-
32
-
33
-
34
-
35
-
36
-
37
-
38
-
39
-
40
-
41
-
42
-
43
-
44
-
45
-
46
-
47
-
48
-
49
-
50
-
51
-
52
-
53
-
54
-
55
-
56
-
57
-
58
-
59
-
60
-
61
-
62
-
63
-
64
-
65
-
66
-
67
-
68
-
69
-
70
-
71
-
72
-
 73
73 -
 74
74 -
 75
75 -
 76
76 -
 77
77 -
 78
78 -
 79
79 -
 80
80 -
 81
81 -
 82
82 -
 83
83 -
84
-
85
-
86
-
87
-
88
-
89
-
90
-
91
-
92
-
93
-
94
-
95
-
96
-
97
-
98
-
99
-
100
-
101
-
102
-
103
-
104
-
105
-
106
-
107
-
108
-
109
-
110
-
111
-
112
-
113
-
114
-
115
-
116
-
117
-
118
-
119
-
120
-
121
-
122
-
123
-
124
-
125
-
126
-
127
-
128
-
129
-
130
-
131
-
132
-
133
-
134
-
135
-
136
-
137
-
138
-
139
-
140
-
141
-
142
-
143
-
144
-
145
-
146
-
147
-
148
-
149
-
150
-
151
-
152
-
153
-
154
-
155
-
156
-
157
-
158
-
159
-
160
-
161
-
162
-
163
-
164
-
165
-
166
-
167
-
168
-
169
-
170
-
171
-
172
-
173
-
174
-
175
-
176
-
177
-
178
-
179
-
180
-
181
-
182
-
183
-
184
-
185
-
186
-
187
-
188
-
189
-
190
-
191
-
192
-
193
-
194
-
195
-
196
-
197
-
198
-
199
-
200
-
201
-
202
-
203
-
204
-
205
-
206
-
207
-
208
-
209
-
210
-
211
-
212
-
213
-
214
-
215
-
216
-
217
-
218
-
219
-
220
-
221
-
222
-
223
-
224
-
225
-
226
-
227
-
228
-
229
-
230
-
231
-
232
-
233
-
234
-
235
-
236
-
237
-
238
 |
 |
