Nikon COOLPIX P610 Reference Manual - Page 98
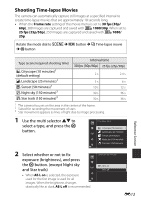
Notes About Time-lapse Movie, Stabilize the ca, era by using a tool such as a tripod.
 |
View all Nikon COOLPIX P610 manuals
Add to My Manuals
Save this manual to your list of manuals |
Page 98 highlights
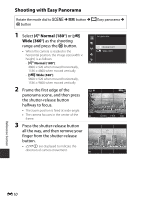
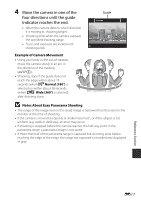
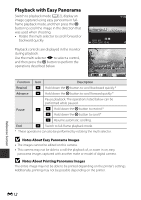
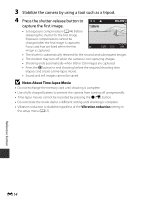
3 Stabilize the camera by using a tool such as a tripod. 4 Press the shutter-release button to capture the first image. 25m 0s • Set exposure compensation (A44) before releasing the shutter for the first image. Exposure compensation cannot be changed after the first image is captured. Focus and hue are fixed when the first 25m 0s 1/250 F5.6 840 image is captured. • The shutter is automatically released for the second and subsequent images. • The monitor may turn off while the camera is not capturing images. • Shooting ends automatically when 300 or 250 images are captured. • Press the k button to end shooting before the required shooting time elapses and create a time-lapse movie. • Sound and still images cannot be saved. B Notes About Time-lapse Movie • Do not exchange the memory card until shooting is complete. • Use a fully charged battery to prevent the camera from turning off unexpectedly. • Time-lapse movies cannot be recorded by pressing the b (e) button. • Do not rotate the mode dial to a different setting until shooting is complete. • Vibration reduction is disabled regardless of the Vibration reduction setting in the setup menu (A57). Reference Section E14
-
 1
1 -
2
-
3
-
4
-
5
-
6
-
7
-
8
-
9
-
10
-
11
-
12
-
13
-
14
-
15
-
16
-
17
-
18
-
19
-
20
-
21
-
22
-
23
-
24
-
25
-
26
-
27
-
28
-
29
-
30
-
31
-
32
-
33
-
34
-
35
-
36
-
37
-
38
-
39
-
40
-
41
-
42
-
43
-
44
-
45
-
46
-
47
-
48
-
49
-
50
-
51
-
52
-
53
-
54
-
55
-
56
-
57
-
58
-
59
-
60
-
61
-
62
-
63
-
64
-
65
-
66
-
67
-
68
-
69
-
70
-
71
-
72
-
73
-
74
-
75
-
76
-
77
-
78
-
79
-
80
-
81
-
82
-
83
-
84
-
85
-
86
-
87
-
88
-
89
-
90
-
91
-
92
-
 93
93 -
 94
94 -
 95
95 -
 96
96 -
 97
97 -
 98
98 -
 99
99 -
 100
100 -
 101
101 -
 102
102 -
 103
103 -
104
-
105
-
106
-
107
-
108
-
109
-
110
-
111
-
112
-
113
-
114
-
115
-
116
-
117
-
118
-
119
-
120
-
121
-
122
-
123
-
124
-
125
-
126
-
127
-
128
-
129
-
130
-
131
-
132
-
133
-
134
-
135
-
136
-
137
-
138
-
139
-
140
-
141
-
142
-
143
-
144
-
145
-
146
-
147
-
148
-
149
-
150
-
151
-
152
-
153
-
154
-
155
-
156
-
157
-
158
-
159
-
160
-
161
-
162
-
163
-
164
-
165
-
166
-
167
-
168
-
169
-
170
-
171
-
172
-
173
-
174
-
175
-
176
-
177
-
178
-
179
-
180
-
181
-
182
-
183
-
184
-
185
-
186
-
187
-
188
-
189
-
190
-
191
-
192
-
193
-
194
-
195
-
196
-
197
-
198
-
199
-
200
-
201
-
202
-
203
-
204
-
205
-
206
-
207
-
208
-
209
-
210
-
211
-
212
-
213
-
214
-
215
-
216
-
217
-
218
-
219
-
220
-
221
-
222
-
223
-
224
-
225
-
226
-
227
-
228
-
229
-
230
-
231
-
232
-
233
-
234
-
235
-
236
-
237
-
238
 |
 |
