Oki MB480 PrintSuperVision 4.0 User Guide - Page 28
Creating User Groups, Changing Your Password, Creating / Editing Groups of Devices
 |
View all Oki MB480 manuals
Add to My Manuals
Save this manual to your list of manuals |
Page 28 highlights
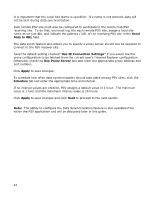
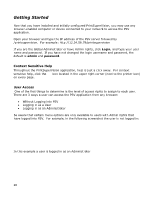
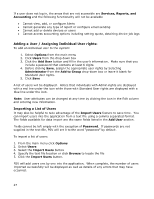
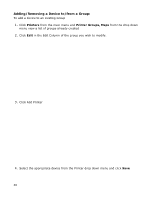
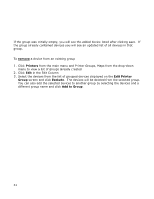
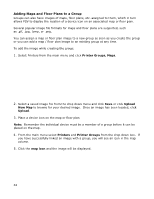
Creating User Groups: In large organizations it may be helpful to organize users into groups based on admin status, user status or by any number of criteria. This feature should not be confused with creating groups of print devices which is also possible in PSV and described in the next section. To create a group of users: 1. Click your browser's back button or select Options from the main menu 2. Select User from the drop down box. 3. Click the User Groups button 4. Click the Add User Group button 5. Enter a name for the user group 6. Click Save. A list of groups will be displayed. You will notice that the new group name is automatically added to the Add to Group drop down menu when adding an individual user. For convenience, the All Users button has been provided in the User Groups area to help identify if an individual has been assigned to a group. Changing Your Password: 1. Select Options from the main menu 2. Click Change Password 3. Enter your current password, then enter your new password and confirm the new password by typing it again 4. Click Change to save new password Creating / Editing Groups of Devices: Before discovering the devices on your network, it may be beneficial to organize them into logical groups in order to monitor and manage them in an efficient manner. A Group can have attributes assigned to it such as location, contact person, SNMP community and even images of maps and floor plans which are used to quickly locate individual devices Groups can be arranged in a hierarchy where a "parent group" can contain sub groups. A device can also be a member of more than one group You can assign a subnet or a range of IP addresses (for discovery purposes) to a group, and as an added convenience, a link to the discovery screen is provided when groups are displayed. To create or edit a Group: 1. Click Printers from the main menu and Printer Groups, Maps from the drop down menu to view a list of groups already created. 28
-
 1
1 -
2
-
3
-
4
-
5
-
6
-
7
-
8
-
9
-
10
-
11
-
12
-
13
-
14
-
15
-
16
-
17
-
18
-
19
-
20
-
21
-
22
-
 23
23 -
 24
24 -
 25
25 -
 26
26 -
 27
27 -
 28
28 -
 29
29 -
 30
30 -
 31
31 -
 32
32 -
 33
33 -
34
-
35
-
36
-
37
-
38
-
39
-
40
-
41
-
42
-
43
-
44
-
45
-
46
-
47
-
48
-
49
-
50
-
51
-
52
-
53
-
54
-
55
-
56
-
57
-
58
-
59
-
60
-
61
-
62
-
63
-
64
-
65
-
66
-
67
-
68
-
69
-
70
-
71
-
72
-
73
-
74
-
75
-
76
-
77
-
78
-
79
-
80
-
81
-
82
-
83
-
84
-
85
-
86
-
87
-
88
-
89
-
90
-
91
-
92
-
93
-
94
-
95
-
96
-
97
-
98
-
99
-
100
-
101
-
102
-
103
-
104
-
105
-
106
-
107
-
108
-
109
-
110
-
111
-
112
-
113
-
114
-
115
-
116
-
117
-
118
-
119
-
120
-
121
-
122
-
123
-
124
-
125
-
126
-
127
-
128
-
129
-
130
-
131
-
132
-
133
-
134
-
135
-
136
-
137
-
138
-
139
-
140
-
141
-
142
-
143
-
144
-
145
-
146
-
147
-
148
-
149
-
150
-
151
-
152
-
153
-
154
-
155
-
156
-
157
-
158
-
159
-
160
-
161
-
162
-
163
-
164
-
165
-
166
-
167
-
168
-
169
-
170
-
171
-
172
-
173
-
174
-
175
-
176
-
177
-
178
-
179
-
180
-
181
-
182
-
183
-
184
-
185
-
186
-
187
-
188
-
189
-
190
-
191
-
192
-
193
-
194
-
195
-
196
-
197
 |
 |
