Onkyo TX-DS676 Owner Manual - Page 13
Connecting the power, Connecting an equalizer - settings
 |
View all Onkyo TX-DS676 manuals
Add to My Manuals
Save this manual to your list of manuals |
Page 13 highlights
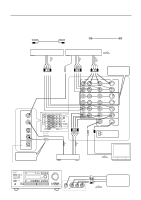
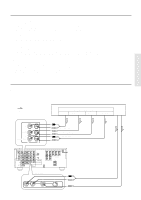
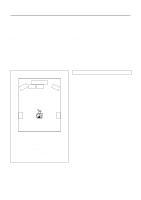
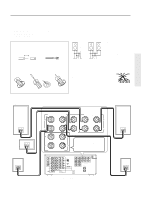
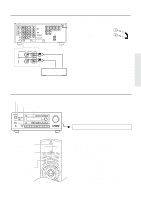
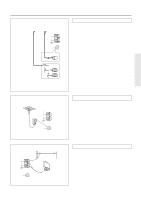
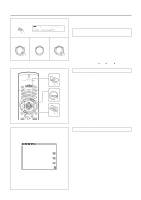
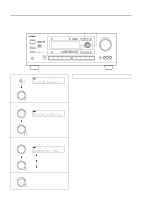
Connecting an equalizer (TX-DS777) TX-DS777 DIGITAL INPUT R AMP IN COAXIAL 1 COAXIAL 2 OPTICAL 1 FRONT PRE OUT FRONT SUB WOOFER CENTER OPTICAL 2 SURROUND FRONT OPTICAL DIGITAL OUTPUT SUB WOOFER CENTER SURROUND MULTI CHANNEL INPUT R CD GMD PHONO R L L L R L V S OUT VIDEO-1 IN VIDEO-2 VIDEO-3 OUT IN IN ANTENNA AM FM 75 DVD IN (REC) OUT TAPE MONITOR OUT V S IN (PLAY) R L VIDEO S VIDEO OSD SELECTOR TX-DS777 SURROUND SPEAKERS FRONT SPEAKERS A R L R L CENTER SPEAKER R L FRONT SPEAKERS B AC OUTLETS SWITCHED TOTAL 100W MAX. W REMOTE CONTROL The AMP IN and the PREOUT FRONT connectors are attached with jumper plugs. When connecting an equalizer, remove these jumper plugs before connecting the audio connection cables. 1. Remove the jumper plugs. See "Connecting power amplifiers." 2. Connect an equalizer. R L AMP IN FRONT PRE OUT FRONT Output jack Input jack Input jack Epualizer Connecting the power 3. STANDBY/ON button STANDBY indicator 2. POWER switch Display STANDBY/ON STAND-BY POWER ON OFF A SPEAKERS B PHONES DIMMER FM MUTE/ MODE DOWN TUNING UP CHARACTER/ MEMORY SP/SYS AUDIO BASS/ SETUP ADJUSTMENT TREBLE MODE PRESET/MODE ADJ MULTI CH INPUT DISPLAY DIRECT STEREO LISTENING MODE /DTS THX SURROUND DSP PUSH TO ENTER REC OUT DIGITAL/ ANALOG CH LEVEL MODE DVD VIDEO-1 VIDEO-2 VIDEO-3 VIDEO-4 TAPE FM AM PHONO C D DOWN MASTER VOLUME UP VIDEO 4/VIDEO CAM INPUT S VIDEO VIDEO L AUDIO R(MONO) AV RECEIVER TX-DS777 2. POWER STNBY button 2. POWER ON button 1. MODE AUDIO button 1. To wall outlet Connecting the power • Before you plug in the receiver, confirm that all connections have been made properly. • Turning on this receiver's power may cause a momentary power surge, which might interfere with other electrical equipment, such as computers. If this happens, use a wall outlet on a different circuit. 1. Plug the power cord into an AC wall outlet. 2. Press the POWER switch to set the receiver to Standby mode. The STANDBY indicator will light up. 3. Press the STANDBY/ON button to turn on the receiver. The display will light up and the STANDBY indicator will be turned off. If you press the STANDBY/ON button, the receiver returns to Standby mode. Turning the power on from the remote controller: 1. Press the MODE AUDIO button. 2. Press the POWER ON button to turn on the power to the receiver, or press the POWER STNBY button to set the receiver in standby mode. • You cannot use the remote controller if the POWER switch on the receiver is set to OFF. • Set the volume level to minimum before you turn off the power to the receiver. 13
-
 1
1 -
2
-
3
-
4
-
5
-
6
-
7
-
 8
8 -
 9
9 -
 10
10 -
 11
11 -
 12
12 -
 13
13 -
 14
14 -
 15
15 -
 16
16 -
 17
17 -
 18
18 -
19
-
20
-
21
-
22
-
23
-
24
-
25
-
26
-
27
-
28
-
29
-
30
-
31
-
32
-
33
-
34
-
35
-
36
-
37
-
38
-
39
-
40
-
41
-
42
-
43
-
44
-
45
-
46
-
47
-
48
-
49
-
50
-
51
-
52
-
53
-
54
-
55
-
56
-
57
-
58
-
59
-
60
-
61
-
62
-
63
-
64
 |
 |