Onkyo TX-DS676 Owner Manual - Page 23
Playing a digital source Digital Input Setup
 |
View all Onkyo TX-DS676 manuals
Add to My Manuals
Save this manual to your list of manuals |
Page 23 highlights
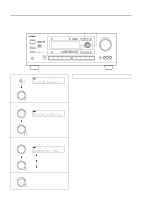
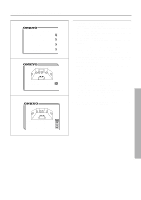
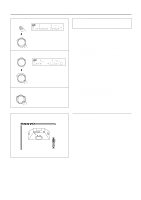
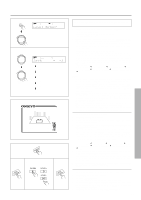
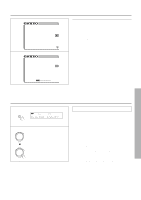
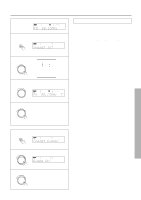
Setting the Speaker level 3 * Bass Peak Setup * Bass Peak Level Limiter = Yes Peak Level =+18dB Starting The Test Tone 4 * Bass Peak Setup * 1.Turn Volume Up. 2.When Sound Distorts. 3.Press ENTER. Level -31dB • Using the on-screen display 1. Press the OSD MENU button. 2. Select "Speaker Setup" and then press the right edge of the ENTER/Cursor button. 3. Select "Bass Peak Setup" and then press the right edge of the ENTER/Cursor button. The "Bass Peak Setup" screen appears. Bass Peak Level Limiter : Turns Yes/No the bass peak limiter. The bass peak level when the bass peak limiter is turned Yes is indicated as "Peak Level." 4. Select "Starting The Test Tone" and then press the right edge of the ENTER/Cursor button. This generates a test signal and automatically sets the unit's MASTER VOLUME control knob to -27 dB. You can now press the right and left edges of the ENTER/Cursor button to adjust the peak level in units of 1 dB. 5. Press the ENTER/Cursor button just before the sound is distorted. The bass peak level is stored and the Speaker Setup screen is displayed again. Playing a digital source (Digital Input Setup) 2 DIGITAL/ ANALOG SPEAKERS A PCM DIGITAL STEREO DIRECT 3 PRESET/MODE ADJ PUSH TO ENTER PRESET/MODE ADJ PUSH TO ENTER Digital input setup Each of the DVD, CD, VIDEO 1-3, and TAPE input channels can be set so that it accepts analog or digital audio input. The default setting is below. Change the setting according to the connection. DVD: OPT2 VIDEO1: COAX1 VIDEO2: - - - - VIDEO3: COAX2 TAPE: - - - - CD: OPT1 Assume that you have connected a DVD player to the COAXIAL 1 connector. 1. Press the DVD input selector button. 2. Press the DIGITAL/ANALOG button until "Digital In- put?" appears. 3. Press the SMART SCAN CONTROLLER. The digital input setup mode has been set. By rotating the SMART SCAN CONTROLLER, select the digi- tal audio input connector "COAX 1," from among "OPT 1," "OPT 2," "COAX 1," "COAX 2" and Selecting "- - - -"sets analog audio input. 4. Press the SMART SCAN CONTROLLER. This completes the digital input setup. To select an input source using the on-screen display, follow steps 1 through 3 described on page 29. 23
-
 1
1 -
2
-
3
-
4
-
5
-
6
-
7
-
8
-
9
-
10
-
11
-
12
-
13
-
14
-
15
-
16
-
17
-
 18
18 -
 19
19 -
 20
20 -
 21
21 -
 22
22 -
 23
23 -
 24
24 -
 25
25 -
 26
26 -
 27
27 -
 28
28 -
29
-
30
-
31
-
32
-
33
-
34
-
35
-
36
-
37
-
38
-
39
-
40
-
41
-
42
-
43
-
44
-
45
-
46
-
47
-
48
-
49
-
50
-
51
-
52
-
53
-
54
-
55
-
56
-
57
-
58
-
59
-
60
-
61
-
62
-
63
-
64
 |
 |
