Onkyo TX-DS676 Owner Manual - Page 21
Setting the speaker Level - weight
 |
View all Onkyo TX-DS676 manuals
Add to My Manuals
Save this manual to your list of manuals |
Page 21 highlights
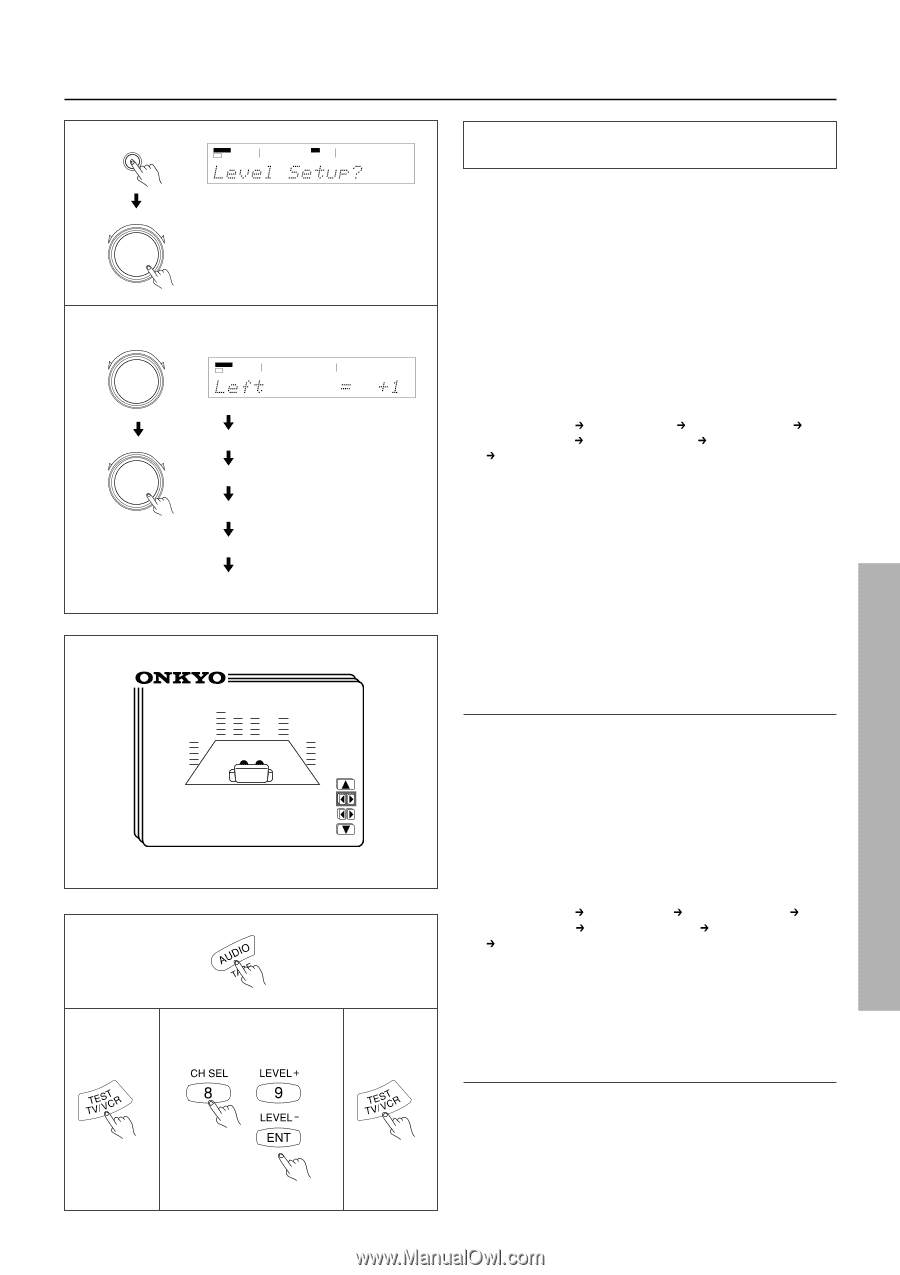
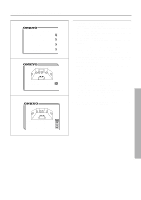
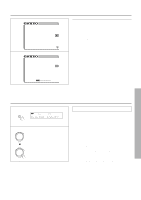
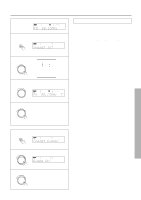
Setting the speaker Level 1 SP/SYS SETUP SPEAKERS DSP A PRESET/MODE ADJ PUSH TO ENTER 2 PRESET/MODE ADJ SPEAKERS A PCM DIGITAL STEREO db PUSH TO ENTER PRESET/MODE ADJ Center Right PUSH TO ENTER R-Sur L-Sur SW * Level Setup * Left Center (Right = +1dB = 0dB = 0dB) 1 2 3 4 Using the test tone to adjust the speaker output levels 1. Press the SP/SYS SETUP button repeatedly until "Level Setup?" appears. Press the SMART SCAN CONTROLLER. The display shows "Left." 2. Rotate clockwise or counterclockwise the SMART SCAN CONTROLLER to adjust the speaker output level. You can adjust the output level of each speaker in the range of 12 to +12 dB, except for the subwoofer whose adjustment range is -30 to +10 dB. Press the SMART SCAN CONTROLLER. You hear a test tone (pink noise) from the left front speaker. Each time you press the SMART SCAN CONTROLLER, the speaker that produces a test tone changes as below. Set the output level of each speaker by rotating the SMART SCAN CONTROLLER so that you can hear the same level of test tone at the listening position. Left (Left front) Center (Center) Right (Right front) R-Sur (Right surround) L-Sur(Left surround) Subwoofer (Subwoofer) Left Notes: • In order to correctly set the output levels, use a hand-held Sound Pressure Level meter (SPL), set to C-Weighting and Slow averaging. A Radio Shack® SPL meter (catalogue number 3302055) or equivalent can be used. Using the internal channel noise generators, set each channel so that you read 75 dB SPL from each channel. • SPEAKER B, when selected, will be deselected automatically as soon as the test tone starts sounding. The Test Tone function is not available when the headphones are connected or when MULTI CH INPUT is selected. • The test tone will not be output from the speaker that has been set to "No" in the configuration setup explained on the page 18,19. • If the speaker level is set to +1dB or higher , the maximum level indicated on the display will change if you raise the volume level. • Using the on-screen display 1. Press the OSD MENU button. 2. Select "Speaker Setup" and then press the right edge of the ENTER/Cursor button. 3. Select "Level Setup" and then press the right edge of the ENTER/Cursor button. The Level Setup screen appears and a test tone (pink noise) is output from the left front speaker. You can change the speaker that outputs the test tone in the following sequence.(When the cursor is on "Center," you can press the lower edge of the ENTER/Cursor button to display additional items.) Left (Left front) Center (Center) Right (Right front) R-Sur (Right surround) L-Sur (Left surround) Subwoofer (Subwoofer) Left. 4. Set the output level of each speaker so that you can hear the same level of test tone at the listening position. You can adjust the output level of each speaker in the range of 12 to +12 dB, except for the subwoofer whose adjustment range is -30 to +10 dB. 5. Press the center of the ENTER/Cursor button, or press the EXIT button, to exit the setup mode. • Using Test button on the remote controller 1. Press the MODE AUDIO button. 2. Press the TEST button. Left front speaker produces the test tone (pink noise). 3. To adjust the level of each speaker,press the CH SEL, but- ton to select a speaker and press the LEVEL +/- buttons to raise or lower the level. 4. Press rhe TEST button to complete adjustment. 21
-
 1
1 -
2
-
3
-
4
-
5
-
6
-
7
-
8
-
9
-
10
-
11
-
12
-
13
-
14
-
15
-
 16
16 -
 17
17 -
 18
18 -
 19
19 -
 20
20 -
 21
21 -
 22
22 -
 23
23 -
 24
24 -
 25
25 -
 26
26 -
27
-
28
-
29
-
30
-
31
-
32
-
33
-
34
-
35
-
36
-
37
-
38
-
39
-
40
-
41
-
42
-
43
-
44
-
45
-
46
-
47
-
48
-
49
-
50
-
51
-
52
-
53
-
54
-
55
-
56
-
57
-
58
-
59
-
60
-
61
-
62
-
63
-
64
 |
 |