Onkyo TX-DS676 Owner Manual - Page 33
Playing a multichannel input source
 |
View all Onkyo TX-DS676 manuals
Add to My Manuals
Save this manual to your list of manuals |
Page 33 highlights
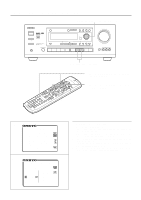
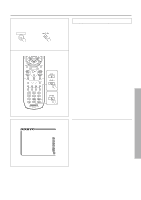
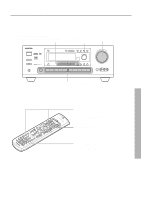
Playing a multichannel input source 1 MULTI CH INPUT Remote controller 3 3 3 Setting the MULTI CHANNEL INPUT To play back an input source you connected with the MULTI CHANNEL INPUT connectors, you must set the output level of each speaker. Also, note that this output level setting must be performed independent of the speaker levels you set using the test tone (see page 21). Before playing movie soundtracks etc. in the multichannel input mode, check again that the source is connected properly (see page 9). 1. Press the MULTI CH INPUT button. If you wish to assign a video source to the multichannel input source, perform the following setting. If you do not wish to do so, proceed to step 3. 1. Press the SP/SYS SETUP button repeatedly until "Video Assign?" appears and then press the SMART SCAN CONTROLLER. 2. Rotate the SMART SCAN CONTROLLER to select the video source you wish to assign and then press the SMART SCAN CONTROLLER. 2. Start playing the component connected to the MULTI CHANNEL INPUT connectors. 3. Press the CH SEL button on the remote controller to select the speaker. Then, press the LEVEL (+ or -) button to adjust the output level. At the listening position, adjust the speaker output level so that you can hear the same sound volume from all speakers. For the right front, left front, center, right surround and left surround speakers, the output levels can be adjusted within the range between -12dB ~ +12 dB. The adjustment range of the subwoofer, however, is -30 to +10 dB. Using the front panel 1. Press the CH LEVEL button. 2. Rotate the SMART SCAN CONTROLLER to select the output level. Repeat the above steps until you set the output levels for all speakers. 6 ** Multi Ch Input ** Level Setup Left Center Right Left Sur Left Sur Subwoofer = 0dB = +5dB = 0dB = 0dB = 0dB =+10dB • Using the on-screen display 1. Press the OSD MENU button. 2. Select "Input Selector" and press the right edge of the EN- TER/Cursor button. 3. Press the right or left edge of the ENTER/Cursor button to select "MULTI CH." Then, press the center of the ENTER/ Cursor button. The "Multi Ch Input" screen appears. 4. If you wish to skip assigning a video source, proceed to step 5. To assign a video source, select "Video Assign Setup" and then press the right edge of the ENTER/Cursor button. When "Video Assign Setup" screen appears, move the cursor (which is already located at "MULTI CH") rightward or leftward to select the video source you wish to assign. When selected, press the center of the ENTER/Cursor button to return to the previous screen. 5. Select "Level Setup" and press the right edge of the ENTER/ Cursor button. "Multi Ch Input Level Setup" screen appears. 6. Press the upper or lower edge of the ENTER/Cursor button to select the item. Then, press the right or left edge of the button to select the desired parameter. At the listening position, adjust the speaker output level so that you can hear the same sound volume from all speakers. For the right front, left front, center, right surround and left surround speakers, the output levels can be adjusted within the range of -12 dB/+12 dB. The adjustment range of the subwoofer, however, is -30 to +10 dB. 7. Press the center of the ENTER/Cursor button, or press the EXIT button, to exit the setup mode. 33
-
 1
1 -
2
-
3
-
4
-
5
-
6
-
7
-
8
-
9
-
10
-
11
-
12
-
13
-
14
-
15
-
16
-
17
-
18
-
19
-
20
-
21
-
22
-
23
-
24
-
25
-
26
-
27
-
 28
28 -
 29
29 -
 30
30 -
 31
31 -
 32
32 -
 33
33 -
 34
34 -
 35
35 -
 36
36 -
 37
37 -
 38
38 -
39
-
40
-
41
-
42
-
43
-
44
-
45
-
46
-
47
-
48
-
49
-
50
-
51
-
52
-
53
-
54
-
55
-
56
-
57
-
58
-
59
-
60
-
61
-
62
-
63
-
64
 |
 |
