Onkyo TX-SR600 Owner Manual - Page 21
V TRIGGER ZONE 2 terminal, PRE OUT - audio video receiver
 |
View all Onkyo TX-SR600 manuals
Add to My Manuals
Save this manual to your list of manuals |
Page 21 highlights
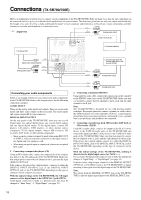
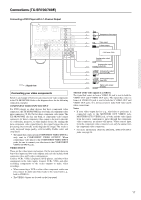
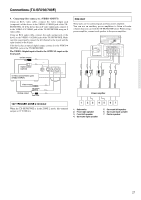
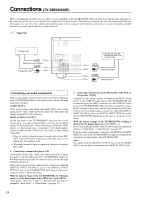
Connections (TX-SR700/700E) 9. Connecting video camera, etc. (VIDEO 4 INPUT) Using an RCA video cable, connect the video output jack (composite) of the device to the VIDEO 4 VIDEO jack of the TXSR700/700E. Or if the device has an S video output jack, connect it to the VIDEO 4 S VIDEO jack of the TX-SR700/700E using an S video cable. Using an RCA audio cable, connect the audio output jack of the device to the VIDEO 4 AUDIO jacks of the TX-SR700/700E. Make sure that you properly connect the left channel to the L jack and the right channel to the R jack. If the device has an optical digital output, connect it to the VIDEO 4 DIGITAL jack of the TX-SR700/700E. The VIDEO 4 digital input is fixed to the OPTICAL input on the front panel. S Video output PRE OUT These jacks are for connecting an auxiliary power amplifier. You can use an auxiliary power amplifiers to listen at louder volumes than you can with the TX-SR700/700E alone. When using a power amplifier, connect each speaker to the power amplifier. ANTENNA FM AM 75 GND R L PHONO IN COMPONENT VIDEO INPUT 2 INPUT 1 OUTPUT Y L PB DIGITAL INPUT OPTICAL 2 1 DIGITAL VIDEO 3 OUTPUT COAXIAL IN OPTICAL VIDEO 2 OUT IN VIDEO 1 OUT IN REMOTE PR CONTROL DVD IN MONITOR OUT V R ZONE 2 12 V TRIGGER OUT SUBWOOFER PRE OUT IN L R CD COAXIAL DIGITAL INPUT OUT IN IN OUT IN TAPE VIDEO 3 VIDEO 2 S IR IN OUT IN FRONT SURR CENTER L VIDEO 1 R DVD SUB WOOFER FRONT SPEAKERS 27122974 CAUTION: SPEAKER IMPEDANCE 6 OHMS MIN. /SPEAKER ZONE 2 SPEAKERS SURROUND SPEAKERS L CENTER SPEAKER R FRONT SURROUND CENTER L ZONE 2 L SURROUND BACK SPEAKER PRE OUT R R AV RECEIVER MODEL NO. TX-SR700E SURROUND BACK AC OUTLETS AC 230-240V 50 Hz SWITCHED TOTAL 100W MAX. L SUBWOOFER PRE OUT R CD FRONT SURROUND CENTER L ZONE 2 L SURROU BACK SPEAKE PRE OUT R R SURROUND BACK Digital output (optical) R (red) L (white) R (red) L (white) Surround back Center 9. Video camera/Video game (VIDEO 4 INPUT) Video output Left (white) Analog output Right (red) Subwoofer Front Surround Power amplifier 12V TRIGGER ZONE 2 terminal When the TX-SR700/700E is in the ZONE 2 mode, this terminal outputs at 12 V/100 mA. 1 23 45 67 1. Subwoofer 2. Front right speaker 3. Front left speaker 4. Surround right speaker 5. Surround left speaker 6. Surround back speaker 7. Center speaker 21
-
 1
1 -
2
-
3
-
4
-
5
-
6
-
7
-
8
-
9
-
10
-
11
-
12
-
13
-
14
-
15
-
 16
16 -
 17
17 -
 18
18 -
 19
19 -
 20
20 -
 21
21 -
 22
22 -
 23
23 -
 24
24 -
 25
25 -
 26
26 -
27
-
28
-
29
-
30
-
31
-
32
-
33
-
34
-
35
-
36
-
37
-
38
-
39
-
40
-
41
-
42
-
43
-
44
-
45
-
46
-
47
-
48
-
49
-
50
-
51
-
52
-
53
-
54
-
55
-
56
-
57
-
58
-
59
-
60
-
61
-
62
-
63
-
64
-
65
-
66
-
67
-
68
-
69
-
70
-
71
-
72
-
73
-
74
-
75
-
76
-
77
-
78
-
79
-
80
 |
 |
