Onkyo TX-SR600 Owner Manual - Page 56
OSD Setup and Other Settings
 |
View all Onkyo TX-SR600 manuals
Add to My Manuals
Save this manual to your list of manuals |
Page 56 highlights
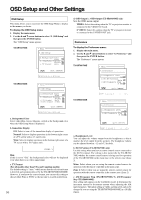
OSD Setup and Other Settings OSD Setup This menu allows you to customize the OSD Setup Menu to display in the manner you desire. To display the OSD Setup menu: 1. Display the main menu. 2. Use the and cursor buttons to select "5. OSD Setup" and then press the ENTER button. The "OSD Setup" menu appears. TX-SR700/700E * Menu 1235....*SSLO*ppeS*eevD*aae*kklS*eee*rrCt*au*CDlp*oii*nsb*ftr*iaa*gnt*ci*eo*n****** 456...abIOP..nSrBIpDeamufcmtSekeergdSterieunoatpcutuenepdDC:ioBsllpoulreay :Normal c.TV Format :Auto Quit:|SETUP| TX-SR600/600E * Menu 1235....*SSLO*ppeS*eevD*aae*kklS*eee*rrCt*au*CDlp*oii*nsb*ftr*iaa*gnt*ci*eo*n****** 456...abIOP..nSrBIpDeamufcmtSekeergdSterieunoatpcutuenepdDC:ioBsllpoulreay :Normal c.TV Format :Auto d.OSD Output :Video Quit:|SETUP| a. Background Color Select either Blue, Green, Magenta, or Red as the background color when the OSD Setup Menu is displayed. b. Immediate Display Off: Select to turn off the immediate display of operations. Normal: Select to display operations in the bottom right corner of a TV screen with a 4:3 aspect ratio. Wide: Select to display operations in the bottom right corner of a TV screen with a 16:9 aspect ratio. VIDEO 1 Hint: If this is set to "Off," the background color will not be displayed even when there is no video signal input. c. TV Format (For all models other than USA and Canadian models) The default setting is "Auto," which means that the television format is detected and automatically set by the TX-SR700/700E/600/600E. However, if you know the correct format, you can use this setting to choose either PAL or NTSC so that no time is wasted on detection. 56 d. OSD Output/ c. OSD Output (TX-SR600/600E only) Sets the OSD menu output. VIDEO: Select this setting when the TV or projector monitor is connected to the VIDEO OUT jack. S VIDEO: Select this setting when the TV or projector monitor is connected to the S VIDEO OUT jack. Preference To display the Preference menu: 1. Display the main menu. 2. Use the and cursor buttons to select "6. Preference" and then press the ENTER button. The "Preference" menu appears. TX-SR700/700E * Menu 1236....*SSLP*pper*eeve*aaef*kkle*eer*rrCe*an*CDlc*oiie*nsb*ftr*iaa*gnt*ci*eo*n****** 456...abIOP..nSrHIpDeeRufatSedIerpNSteheunoPtpcnoueespsitLieov:nel0dB :Main c.AM Frequency Step :9 kHz Quit:|SETUP| TX-SR600/600E db * Menu 1236....*SSLP*pper*eeve*aaef*kkle*eer*rrCe*an*CDlc*oiie*nsb*ftr*iaa*gnt*ci*eo*n****** 456...abIOP..nSrHApDeeMufatSedFerprSteheeunoqtpcnuueeepsncLyev:Setle0pdB :9 kHz Quit:|SETUP| db a. Headphones Level You can adjust the volume output from the headphones so that it matches the level output from the speakers. The headphone volume can be adjusted between -12 and +12 decibels. b. IR IN Position (TX-SR700/700E only) Use this setting when you have a remote control sensor connected to the IR IN terminal. The setting in this menu tells the TX-SR700/ 700E whether the remote control sensor is being used for operation of the TX-SR700/700E in the main zone or the remote zone (Zone 2). Main: Select when you are using the remote control sensor for operation with the remote controller in the main zone. Zone 2: Select when you are using the remote control sensor for operation with the remote controller in the remote zone (Zone 2). c. AM Frequency Step (TX-SR700/700E)/ b. AM Frequency Step (TX-SR600/600E) This setting only appears on the worldwide model. It determines the increment amount or decrement amount when adjusting the AM tuner frequency. The initial setting is 9 kHz, and this needs only to be changed if you are using the TX-SR700/700E/600/600E in a 10-kHz region.
-
 1
1 -
2
-
3
-
4
-
5
-
6
-
7
-
8
-
9
-
10
-
11
-
12
-
13
-
14
-
15
-
16
-
17
-
18
-
19
-
20
-
21
-
22
-
23
-
24
-
25
-
26
-
27
-
28
-
29
-
30
-
31
-
32
-
33
-
34
-
35
-
36
-
37
-
38
-
39
-
40
-
41
-
42
-
43
-
44
-
45
-
46
-
47
-
48
-
49
-
50
-
 51
51 -
 52
52 -
 53
53 -
 54
54 -
 55
55 -
 56
56 -
 57
57 -
 58
58 -
 59
59 -
 60
60 -
 61
61 -
62
-
63
-
64
-
65
-
66
-
67
-
68
-
69
-
70
-
71
-
72
-
73
-
74
-
75
-
76
-
77
-
78
-
79
-
80
 |
 |
