Panasonic DMR-EA18K Dvd Recorder - Multi Language - Page 14
Recording Set Top Box Programs, Pausing Recording
 |
UPC - 037988256600
View all Panasonic DMR-EA18K manuals
Add to My Manuals
Save this manual to your list of manuals |
Page 14 highlights
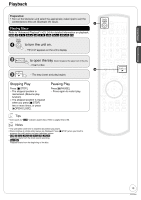
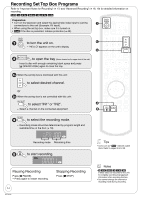
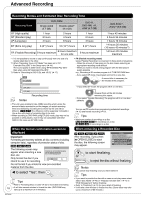
Recording Set Top Box Programs Refer to "Important Notes for Recording" (➔ 17) and "Advanced Recording" (➔ 18, 19) for detailed information on recording. RAM -R -R DL -RW(V) +R +R DL +RW Preparation: • Turn on the television and select the appropriate video input to suit the connections to this unit (Example: AV input). • When using the set top box, make sure it is turned on. • RAM If the disc is protected, release protection (➔ 40). to turn the unit on. 3a - "HELLO" appears on the unit's display. 3b ;OPEN/CLOSE to open the tray (Button located on the upper front of the unit). - Insert a disc with enough remaining blank space and press [; OPEN/CLOSE] again to close the tray. 3a When the set top box is controlled with this unit: to select desired channel. or 3b When the set top box is not controlled with this unit: to select "IN1" or "IN2". - Select a channel on the connected equipment. to select the recording mode. - Recording mode should be determined by program length and available time on the disc (➔ 18). Recording mode Remaining time to start recording. REC Pausing Recording Press [h PAUSE]. - Press again to restart recording. Stopping Recording Press [g STOP]. 14 RQT9048 Tips • Icons such as " RAM " indicate usable discs. Refer to pages 55 and 56. Notes • -R -R DL -RW(V) +R +R DL +RW It takes about 30 seconds for the unit to complete recording management information after recording finishes. • You cannot change the channel or recording mode during recording.
-
 1
1 -
2
-
3
-
4
-
5
-
6
-
7
-
8
-
 9
9 -
 10
10 -
 11
11 -
 12
12 -
 13
13 -
 14
14 -
 15
15 -
 16
16 -
 17
17 -
 18
18 -
 19
19 -
20
-
21
-
22
-
23
-
24
-
25
-
26
-
27
-
28
-
29
-
30
-
31
-
32
-
33
-
34
-
35
-
36
-
37
-
38
-
39
-
40
-
41
-
42
-
43
-
44
-
45
-
46
-
47
-
48
-
49
-
50
-
51
-
52
-
53
-
54
-
55
-
56
-
57
-
58
-
59
-
60
-
61
-
62
-
63
-
64
-
65
-
66
-
67
-
68
-
69
-
70
-
71
-
72
-
73
-
74
-
75
-
76
 |
 |
